
Winterizing Your Camper
Winterizing the Hot Water Heater / Outside Shower / Interior Shower / Cassette Toilet
To reduce the possibility of fractures and splits in the system's water tanks, lines, and water pumps in climates where the temperature is below freezing (32 degrees F; 0 degrees C), it is recommended that as much water as possible be drained from the system. You can also add a mixture of water and non-toxic antifreeze to the camper’s water system.
CAUTION: Be sure to release the water pressure in the water lines before draining the system.
(This can be accomplished by opening both the hot & cold water faucets on the sink)
Step 1: Drain the 20 Gallon Freshwater Tank and Drain Line
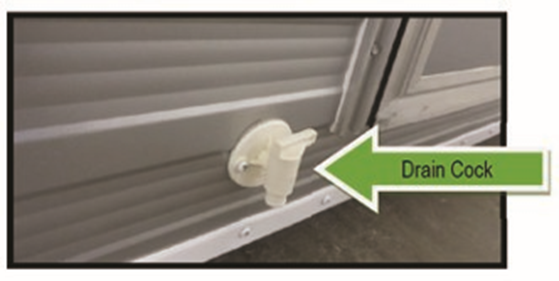
The 20 Gallon Fresh Water Tank is usually located under the camper's front seat area (near the front wall of the camper), and the exterior drain valve (drain cock) is usually located on the rear / exterior wall of the camper (outside), usually near the camper entry door. To drain the 20 gallon fresh water tank, make sure your truck is parked level, or better yet parked on a slight incline. Parking the truck on a slight incline will help to ensure gravity to completely drain the water out the fresh water tank. Next, open the hot and cold water valves on the sink faucet and leave them open. Next, open (twist) the exterior drain valve on the rear wall of the camper and leave it open until the 20 gallon fresh water tank is drained and water stops coming out.
-
If your 20 gallon water tank is full, the draining process might take quite a while.
-
After the main water tank is empty, leave the small tank drain cock on the outside of the camper “OPEN”.
Step 2: Open the Low Water Valve
Open both the hot water heater filling valve and also the low point water value inside your kitchen cabinets (if equipped). To open them, turn each valve ¼ turn counter-clockwise. Leave them open.
Note: The hot & cold faucets should already be open if you have followed Step 1 from above. With the sinks faucets open, the drain valves open, and the fresh water tank empty, the water in the hot water tank should slowly drain down & out, back down into your 20 gallon fresh water tank. As the hot water heater tank is draining, you will probably also notice water start to drain out of the 20 gallon main water tank drain cock located on the rear / outside of the camper. Leave all valves, faucets, and the exterior drain cock “open” and allow some time for the water to drain out (this can take a while, so we recommend finding something else to do and come back after a while to see when the tanks are finished emptying, or move on to Step 3 below. to see when the tanks are finished emptying, or move on to Step 3 below.
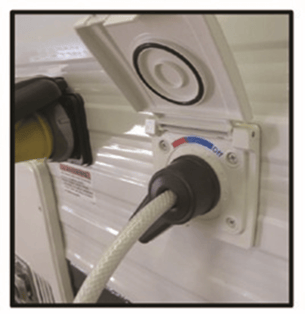
Step 3: Drain the Shower Hoses
Turn off your electric water pump. Make sure your water drain valves inside the camper are “open”. Then open the access cover to the exterior & interior hot water shower connections (if equipped). Insert & connect the shower wand & hose. Extend the shower hose until it is straight. With the hose straightened, position the shower head so that it is lower than where the hose is attached to the shower compartment. This will allow gravity to drain the water out for you. Make sure the shower wand control knob on the head of the shower wand is twisted to the “open” position to allow any trapped water to exit.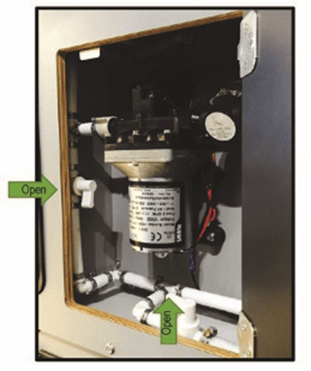
Step 4: Further Drain Water Lines
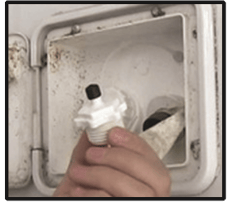
Run the electric Water Pump for approximately 15 to 20 seconds, or as long as water is flowing out from the sink faucet, with both the hot & cold water at the kitchen sink valves opened. This should help to remove as much remaining water from the system as possible. Turn the electric water pump “OFF”, and leave both the hot & cold faucets on the sink “OPEN” position so that any excess water that could potentially freeze will have room for expansion (instead of cracking a water line or fittings). After all the water has been drained from the system use the supplied Blowout Plug (1) to blow out any excess moisture out of the system.
Step 5: Add Non-Toxic Antifreeze (optional)
If you are going to add Non-toxic RV Antifreeze to your camper water system for possible freezing water temperatures, you will need to add the correct amount of properly prepared “non-toxic” RV Antifreeze and water solution back into your 20 gallon fresh water tank by pouring it into the fresh water filler port located on the outside of the camper. See antifreeze manufacturer's Water / Antifreeze mixture recommendations.
-
Once you have a few gallons of properly mixed water/anti-freeze in the fresh water holding tank, turn on your electric water pump.
-
Open the cold water valve at your sink faucet and run until you can see some of the antifreeze/water mixture flow from the sink faucets.
-
Close the sink faucets.
-
Next, operating just one shower fixture at a time, hook up both the inside shower wand & outside shower wand (if equipped) and turn on the electric water pump.
-
Open the cold water valve, and run for a few moments until you can see some of the anti-freeze mixture come out.
-
Close both shower water valves and disconnect the shower wand. Once disconnected, drain the shower wand & shower hose before storing it away.
-
Drain the kitchen sink (if needed) and replace the cap on the sink's gray water spout (exterior of camper).
Note: Instead of storing the hot water heater full of the RV Antifreeze for Winterizing, most customers usually drain the water out of the hot water heater and leave it empty of water.
-
Once you have drained the hot water heater, drained the 20 gallon fresh water tank, introduced the non-toxic RV antifreeze, then go back through the camper and make sure your sink faucets are open, and open the hot water tank valve insides the cabinets.
-
Next, make sure plastic drain cock on the rear wall of the camper is also open. This will allow any possible trapped water to move freely (instead of expanding outward and possibly cracking a water line) if it were to freeze.
De-Winterizing Water System
Step 1: Before refilling and using the 20 Gallon fresh water tank inside the camper for your next trip, you should drain & flush out any possible remaining non-toxic anti-freeze mixture out of the camper water system (if you took this step). It is also a good idea to fill & flush both the 20-gallon fresh water holding tanks and the 6 gallon hot water heater (if equipped).
Step 2: Before running the water pump or filling the water tank, make sure the sink and shower faucets are “Closed”, the upper hot water heater tank filling valve is inside the kitchen cabinets is in the “Open” position, the lower water heater drain valve is “Closed”, and the drain cock on the rear wall of the camper (exterior) is “Closed”.
Step 3: Next, open the water filler door on the outside of the camper and fill the 20-gallon fresh water tank (using clean potable water).
Step 4: Once you have water in the 20-gallon fresh water tank, open your hot water knob or cold water knob, (or both) at the sink and then turn the water pump switch to the “ON” position (located on the small “water/battery monitor”) on the front of the kitchen cabinets. This will start to pump water through the lines and remove any air trapped in the water lines.
Step 5: Run the water pump until you have a smooth, steady flow of water coming out both your cold & hot water valves.
Note: If the hot water heater tank has not been filled it can take a few minutes for the 6-gallon hot water tank to completely fill up. This is normal.
Step 6: Once the water tanks are full and the water lines have been purged of air, water is flowing smoothly from both the hot & cold water faucets at the sink, your system should be ready to use. Go ahead and top off the 20-gallon fresh water tank if you like (as you will have used some water filling & flushing your system).
Step 7: The pressurized water system with the on-demand water pump can be left on at all times when you are using the sinks or showers (provided there is water in the fresh water tank). The “on-demand” water pump should automatically turn off when your sink faucets and/or shower faucets are closed (the water pump should automatically shut off once it reaches a certain pressure). But that said, it is always best to turn the water pump switch “OFF” when you are not using the sink or shower fixtures.
Step 8: When traveling or when finished using the camper, please turn off water pump switch. After the water pump switch is turned off, you can also gently open the hot and cold faucets at the sink to remove any excess water pressure from the system, then close the faucets after the pressure has been released. If you feel the need, you can repeat the draining & filling process one more time if you think there might still be contaminates in your fresh water system.