Truck to Camper Wiring Instructions
Wiring Instructions for Slide-In & Flatbed Campers (Production Week 3/20/23 and on)
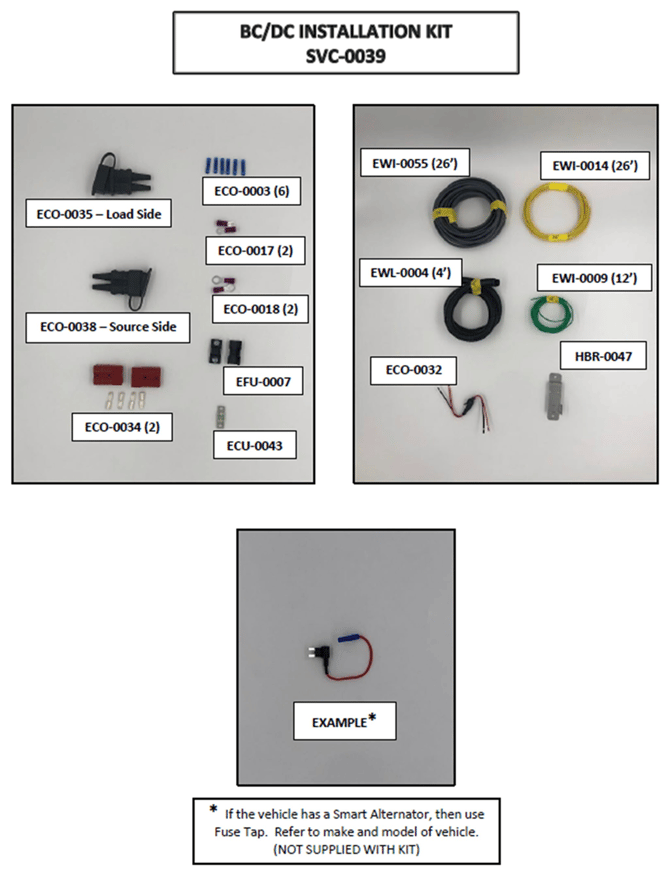
Wire Parts Needed
Wire bundle includes:
-
8 AWG Positive Wire: Only if camper is equipped with 25 amp BCDC charger (AGM & Basic Lithium)
-
Or 6 AWG Positive Wire: Only if camper is equipped with Manager 30 (Lithium)
-
Green 14 AWG Marker Light Wire: Only if camper is a Raven, Hawk or Grandby (full size campers).
- Yellow 14 AWG Ignition Trigger Wire: Only use if truck is equipped with Smart Alternator.
Step 1: Assemble Anderson SB50 Connector and Bracket
-
Strip ½ inch off of the positive and negative wires and ¼ inch off of the marker light (if equip) and the ignition trigger wires (if truck has smart alternator).
-
Trim cable entry on the SB50 weatherproof boot (labeled “source”) to the appropriate wire size.
-
Crimp SB50 fittings onto the positive and negative truck charging wires.
-
Insert the wires through the weatherproof boot, and insert into the SB50 body.
-
Install the weatherproof boot over the SB50
-
Using a pick, locate the holes in the SB50 through the weatherproof seal.
-
Install hardware through the holes, and secure the SB50 to the bracket with nylock nuts.
-
Install the superseal female side on the bracket, feeding the connector through the tab. Run a zip tie around the connector and through the oval holes on the base of the bracket. Install another zip tie around the portion of the connector located behind the vertical tab.
-
Crimp the marker light wire to the red lead of the superseal connector, and the ignition trigger wire to the black lead.
-
Repeat assembly to attach wires to camper wire bundle, if plugs are not already installed. ‐ Using black electrical tape, properly cover any exposed wires or wiring.
Step 2: Drill Hole in Truck Bed Sidewall
-
Slide In Camper: Inside the truck bed on the driver sidewall, near the front of the bed, find a flat place to mount the connection bracket no higher than 6” from the bedfloor. Drill a 1 3/16th inch hole in the side of the bed wall; do not drill through the outside of the bed.
-
Install plastic grommet in hole to protect wires from sharp metal.
-
-
Flatbed Camper: If Norweld tray, use existing mounting location.
Note: drilling through the bed makes hot metal shavings. You should wear long sleeves and a face shield.
Step 3: Run Wires
-
Run the wire bundle through the hole you drilled or existing mounting location (flatbed).
-
Take the positive, negative and ignition trigger wire along the top of the frame under the truck, up into the engine compartment, and over to the to the truck battery terminals.
-
Take the green marker light wire (if equipped), run from hole in truck bed, over the inner fender liner to the taillight.
Step 4: Attach Anderson SB50 Connector Bracket to Truck Bed
-
Using self tapping screws to install the bracket with the connector facing upward onto the wall of the truck bed.
Step 5: Secure Wire Bundle
-
Work out any slack in the bundle towards the truck engine compartment.
-
Zip tie the wire bundle to the firewall of the engine compartment, keep the wires away from any moving components or parts that might get hot.
Step 6: Prep the Truck Battery Connection
-
At the truck battery, split the positive and negative wires. Run positive wire to the positive post on truck battery. Run negative wire to the battery negative or chassis ground point.
-
Strip the protective cover on the ends of the positive wire and black ground wire back to crimp on the ring connectors.
Step 7: Connect the MIDI Fuse
-
Under the hood of the truck, find a place to mount the MIDI fuse using provided holder, away from any hot/moving parts. Mount within 12 inches of truck battery.
-
Cut the positive wire and strip each end to fit MIDI fuse.
-
Crimp a #10 ring terminal to each end of the positive wire.
-
Then hook each end to either side of the MIDI fuse.
Step 8: Connect Marker Light Wire (if equipped)
Full size campers will have the green marker light wire
-
Tap into taillight power lead. NOTE: Some trucks may need a logic controller. New trucks with low voltage LED taillights may need a fuse tap installed.
-
This marker light wire will be hooked up to the wire that is "hot" when your truck's head lights are turned on. So, when the truck's head lights are "ON", the small LED marker lights on the outside of the camper will automatically come on.
Step 9: Connect Ignition Trigger Wire (if equipped)
Some newer trucks are equipped with smart alternators
-
It can be difficult to determine if a truck has a smart alternator or not. To the test if truck has smart alternator, please see video for guidance (https://www.youtube.com/watch?v=Nkb0nSuRQxE).
-
If truck has smart alternator, locate fuse box under the hood, find a fuse that is ignition hot, use a fuse tap to connect the ignition trigger wire. Fuse box locations and fuse sizes will vary based on truck.
-
If truck is equipped with smart alternator, but ignition trigger is not hooked up, camper charging will be intermittent when driving. May result in low camper batteries.
DO NOT hook up ignition trigger wire if truck is not equipped with smart alternator, remove wire.
Step 10 : Connect the Power System
-
Connect positive wire to truck battery.
-
Connect negative wire to ground.
-
Plug in camper!