

Standard Lithium Power System & Troubleshooting Guide
Camper Types: 2023 or Newer – All Camper Types
This guide covers the basics of the standard lithium power system in campers 2023 or newer, teaches how to identify an issue and some potential solutions. For further support please contact the FWC Service Department (530) 666-1442 or your local dealer.
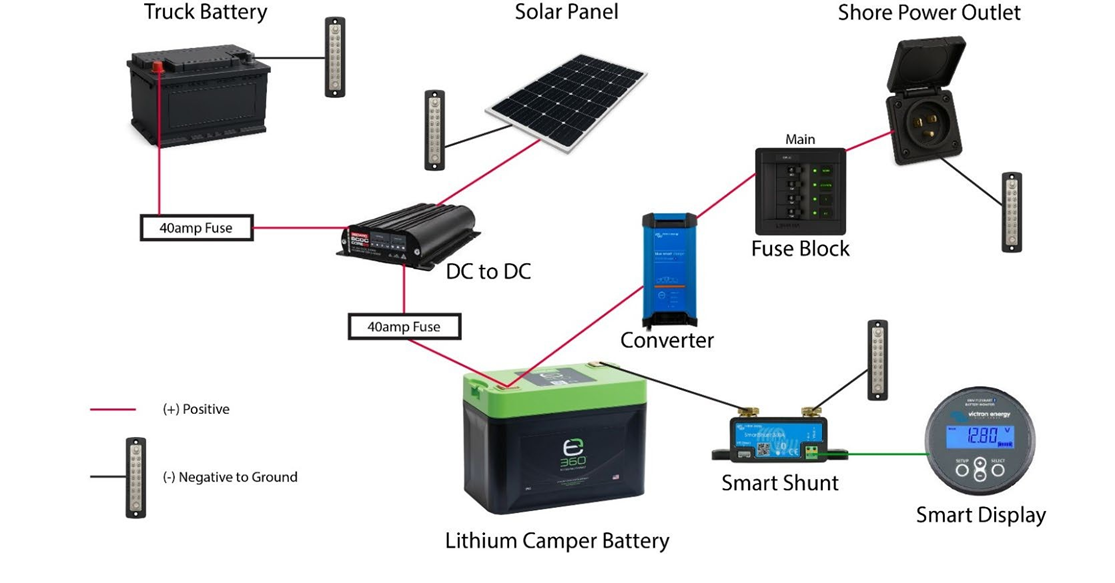
Main Components
- Standard Power System
- Heated Lithium Battery(s)
- DCDC w/ MPPT Solar Controller
- Smart Battery Monitor & Shunt
- Converter (shore power)
- Fuse panel, fuses, ground bars, & wiring
- Power comes into the camper via 3x sources:
- Truck Charging
- Shore Power (optional in base model, n/a in Project M)
- Solar (optional)
Battery(s)
- Battery Brand & Size -
- Campers built before Fall 2024: 135ah Dakota Lithium (heated)
- Campers built after Fall 2024:
- Most campers: 162ah Expion360
- If 3x Li, CampOut or Project M: 132ah Expion360
- Battery Switches
- Dakota Li: No switches
- 162ah Expion360: Has 2x latched switches that will stay depressed when on. One switch for power and one switch for heating element.
- 132ah Expion360: Has 2x momentary switches. Power switch must be held down until blue light comes on. Heat switch needs one press.
- TIP: If battery is in critical condition, heat switch can be turned off to allow for maximum charging. Remember to turn back after charging!
- Battery App
- Dakota Li: May have Bluetooth to connect to Dakota Lithium Power Gauge app
- Expion360: Download the ExpionSmartTalk app for iOS or Android and pair to see the status of each battery.
- Charging Info
- For campers equipped with a converter (shore power), be sure the kill switch is in the on/out position (powered) to allow for camper battery(s) to charge.
- Battery Load
- If connecting aftermarket components (ex: inverter, cpap), ensure every ground is wired to the load/ground side and not the battery side of the Smart Battery Shunt
- Adding a component directly to the battery bypasses the Smart Battery Shunt and will give inaccurate readings. The effect is magnified over time.
- If connecting aftermarket components (ex: inverter, cpap), ensure every ground is wired to the load/ground side and not the battery side of the Smart Battery Shunt
- Battery Management System
- The Expion360 Battery Management System (BMS) protects and balances each battery.
- The BMS will shut off the battery if it senses overvoltage, undervoltage, overcurrent, short circuit or thermal min/max.
- The Expion360 Battery Management System (BMS) protects and balances each battery.
- Refer to manufacturers owner’s manual for further information.
Battery Monitor & Shunt
- The Victron Smart Battery Monitor & Shunt is an intelligent battery monitor that provides detailed usage insight. It measures battery voltage and current as well as calculates the battery's state of charge. There is a small margin of error.
- Link to the VictronConnect app for iOS or Android to see available data.
- How to Read Victron Smart Display:
- State of charge (%): The most useful screen, displayed as a %.
- Voltage (V): Terminal voltage of the battery(s).
- Current (A): This is the actual current in amps flowing in or out of the battery.
- A negative current indicates that current is taken from the battery. This is the current needed for DC loads.
- A positive current means that current is going into the battery. This is current coming from charge sources.
- Keep in mind that the battery monitor will always indicate the total battery current, being the current traveling into the battery minus the current traveling out of the battery.
- Power (W): The power drawn in watts from or received by the battery.
- Refer to manufacturers owner’s manual for further information.
Converter (Shore Power)
- The Blue Smart IP22 Charger converts AC power to DC for battery charging and is specifically engineered to optimize each recharge cycle and charge maintenance over extended periods.
- Link to the VictronConnect app for iOS or Android to see available data.
DCDC w/ MPPT Solar Controller
- The RedArc DCDC w/ MPPT Solar Controller is designed to charge camper battery(s) while on the move and features a Maximum Power Point Tracking (MPPT) solar regulator.
- The DCDC is typically located in the battery compartment or nearby.
- System does not charge unless battery(s) is somewhere below 90% to protect batteries from unnecessary wear and tear.
- How to Read Display Panel:

-
- Profile
- The selected Profile LED (either H or Li) will be on solid when the Unit is ON and charging. A flashing profile LED indicates that the Unit is in standby mode and NOT charging.
- Status
- The Charge Status LEDs indicate which inputs are available and what stage of the charge process the unit is currently in.
- The Solar and Vehicle LEDs will be ON when the input is available and in use and OFF when the input is not available or not in use. If both LEDs are ON, both input sources are available and in use
- The Stage LED indicates the charge profile stage.
- Profile
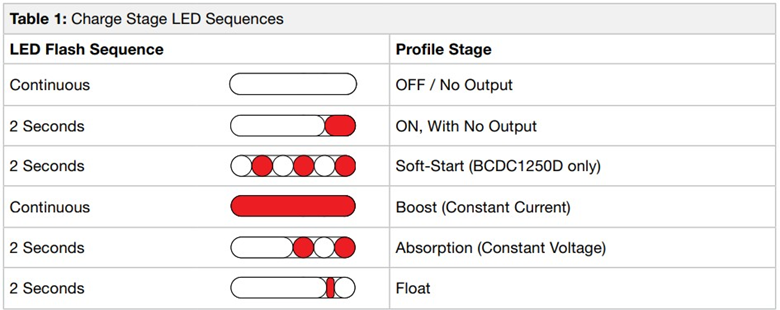
- Refer to manufacturers owner’s manual for further information.
Battery & Charging Troubleshooting
- Signs that camper may have a battery issue:
- No power to camper
- Battery(s) seem to die prematurely
- What to check if there is no power to camper:
- Ensure the kill switch is in the on/out position (powered) to allow for camper battery(s) to power camper. For Project M ensure that the SB50 power plug is connected to topper wiring.
- Ensure battery power switch is on (see above instructions in Battery section).
- Check 40amp midi fuse on 10awg red output wire. (Photo)
- If temperature is below 37 degrees, make sure battery heater is on.
- If steps above are confirmed but there is still no power, next try the following battery wake up procedure. Wake up may be needed if battery has low voltage and DCDC does not see a battery load to begin the charging cycle.
- To start battery wake up procedure:
- Connect camper to shore power.
- Open VictronConnect app and pair with Victron IP22 Smart Charger
- Select Normal + Recondition mode to wake up battery.
- Reduce power load in camper by turning off all appliances.
- Recharge can take a few to several hours.
- Once charged to 100%, turn off Recondition mode in the VictronConnect app. Leaving on long term can shorten lifespan of battery.
- To start battery wake up procedure:
- What to check if battery seems to die prematurely:
- Compare battery voltage reading from Smart Battery Monitor Display and the ExpionSmartTalk app.
- If voltage reading is more than 5% different then:
- Fully charge battery to 100% to recalibrate Smart Battery Monitor.
- If aftermarket components (ex: inverter, cpap) are added to power system, ensure every ground is wired to the load/ground side and not the battery side of the Smart Battery Monitor Shunt. Adding a component directly to the battery bypasses the Smart Battery Shunt and will give inaccurate readings. The effect is magnified over time.
- If voltage reading is more than 5% different then:
- If all the above has been checked but there is still no power, then see section below for potential charging issues & solutions.
- Compare battery voltage reading from Smart Battery Monitor Display and the ExpionSmartTalk app.
- Signs that camper may have a charging issue:
- Battery(s) not charging from shore power, truck or solar.
- To check if shore power is functioning properly:
- Check that the main breaker and converter breaker are on.
- Plug into shore power and make sure 110V power is flowing into the camper by pushing in kill switch to turn off battery power to camper, then test if appliances function on 110V power.
- If there is no power to the camper, then check the 110V connection and cord.
- If there is 110V power:
- Pull kill switch to the out position so that battery power is on. Kill switch must be in the out position for shore power to charge the batteries.
- Pair the Blue Smart IP22 Charger (converter) to VictronConnect app and to check if the system is charging the batteries.
- In bulk phase, the battery will charge at a rate of about 30amps, but as the battery reaches full capacity, charge current will decrease. Once battery(s) are full, then converter will only charge to keep up with draw demand.
- If VictronConnect app does not show charging, then contact your local dealer, there could be an issue with the converter.
- To check if truck charging is functioning properly:
- Note: DCDC may not charge camper if battery(s) are around 90% charged or above.
- If camper batteries are below 90% charge, then:
- With the truck running, check to see if the DCDC truck charge input light is on.
- If the truck charge input light is on, then check the stage LED.
- If the truck charge input light is NOT on:
- Use a multimeter to check voltage at the battery and note reading. Next, check both sides of under hood fuse. Voltage readings should be similar.
- If the voltage reading is NOT similar, then replace under hood 40amp midi fuse.
- If the stage LED is NOT on and the batteries are below around 90% state of charge:
- Use a multimeter to check the voltage on either side of the DCDC 40amp output midi fuse on red 8awg wire located near the battery.
- If the voltage reading is NOT similar, then replace the DCDC 40amp output midi fuse on red 8awg wire located near the battery.
- If all readings have been checked and fuses changed but truck charging is still not functioning, please contact local dealer.
- To check if the solar output is functioning properly:
- Note: DCDC may not charge camper if battery(s) are around 90% charged or above.
- If camper batteries are below 90% charge, then:
- With the Panel in full sun, check to see if the DCDC solar charge input light is on.
- If the solar charge input light is on:
- Check the stage LED
- If the solar charge input light is NOT on:
- Use a voltmeter to probe the portable solar SAE plug found on the rear of the camper and check the voltage. Voltage should be at 18V or more.
- If the voltage is below 18v, contact your local dealer as this could mean there is a solar connection or panel issue.
- If the stage LED is NOT on:
- Use a multimeter to check the voltage on either side of the DCDC 40amp output midi fuse on red 8awg wire located near the battery.
- If the voltage reading is NOT similar, then replace the DCDC 40amp output midi fuse on red 8awg wire located near the battery.
- If all readings have been checked and fuses changed but solar charging is still not functioning, please contact local dealer.