
Dedicated to all your future camper adventures…
Table Of Contents
- Welcome – pg 3
- Video Support
- Owner’s Manual Information
- Community & Events
- Service Appointments
- Legal
- FWC Team Contact Information
- Quick Camp Guide – pg 6
- Camper Basics
- Camper Tips
- Your Camper – pg 7
- Serial Number/Camper ID
- MSO
- Component List & Manufacturer Warranty Info
- Camper Limited Warranty Info
- Installation – pg 11
- Camper Attachments Using Turnbuckles
- Standard
- Mounting Bars for Composite Beds
- External Tie Downs
- Turnbuckle Instructions
- Camper Attachments using Bolts
- Mechanical Camper Jacks
- How to Unload Camper
- How to Load Camper
- Truck to Camper Wiring
- Camper Attachments Using Turnbuckles
- Safety – pg 15
- Propane/ Carbon Monoxide Detector (LP/CO Detector)
- Smoke Detector
- Fire Extinguisher
- Emergency Exit Window
- Glass and Glazing Materials
- Pop Up – pg 17
- Gas Strut Roof Lift Assist
- Raising & Lowering Roof
- Internal Lift Actuator
- Power System – pg 19
- 12v Power System
- Kill Switch
- 120v Power System
- Standard Power System: BCDC
- Advanced Power System
- Shore Power/120v Battery Charging/Power Converter
- Batteries
- Battery Maintenance
- Inverter
- Interior & Exterior Power Plugs
- 12v Power System
- Solar – pg 23
- Solar Wiring and Capacity
- Solar Charge Controller
- Roof Solar
- Rear Solar & Portable Panels
- Self Installed Solar Parameters
- Lighting – pg 24
- Interior Lights
- Exterior Lights
- Water System – pg 25
- Water Tank, Valves & Level Monitor
- Water Tank Fill
- City Water Connection
- Water Pump
- Grey Water
- Water Heater
- Sink and Faucet Operation
- Outside Shower Operation
- Inside Shower Operation
- Sanitizing Water System
- Winterizing Water System
- Air & Heating Systems – pg 31
- Ventilation & Condensation Tips
- Roof Fan Operation
- Furnace System
- 12v Roof Mounted Air Conditioner
- Propane System – pg 33
- Filling Propane Tanks
- External Low Pressure Propane Port
- Interior Features – pg 35
- Floor Plans
- Open Floor Plan (Base Model)
- Rollover Couch
- Side Dinette
- Front Dinette
- Rear Dinette (Flatbed Models)
- Cabover Sleep Platform & Mattress
- Underbed Storage
- Sleeping Bed
- Refrigerator
- Stove Top
- Two Burner Propane Stove
- Two Burner Induction Stove
- Thermal Pack
- Toilets
- Floor Plans
- Exterior Features – pg 39
- Visual Key
- Door & Screen Operation
- Outside Storage
- Orvis Special Edition - Wet Locker and Rod Storage
- Roof Racks
- Tracks Only
- Yakima Systems
- Awnings
- Fiamma
- Alucab Shadow 270
- Shower Enclosure
- Rear and Sidewall Steps
- Flatbed Rear Rack
- Maintenance – pg 43
- Interior
- Bamboo Countertop Care
- Clear Window Care
- Fabric Care
- Condensation
- Exterior
- Pop Up Vinyl
- Long Term Storage
- Interior
- About Four Wheel Campers – pg 44
- Notes
Welcome to the Four Wheel Camper Family!
Dear New Owner,
Welcome to the Four Wheel Campers family! We hope your camper opens the door to unforgettable places, experiences, and adventures. With proper care and regular maintenance, your camper is built to last for decades of exploration.
This Owner’s Manual is designed to guide you through operation procedures, troubleshooting tips, and routine maintenance for your camper. You’ll also find manuals from appliance manufacturers included with the new owner packet - please review all manuals.
At Four Wheel Campers, our mission is to build the highest quality pop-up campers and back them with exceptional customer support. If you ever have questions, need help, or want to schedule service, please reach out to FWC or contact your local dealer.
We’d also love to follow your journey - tag us on social media @fourwheelcampers or use #fourwheelcampers to share your adventures!
Wishing you many happy adventures and safe travels,
The Four Wheel Campers Team
Video Support
Available videos range from how-to’s, troubleshooting, fun marketing videos and other product information. We frequently add and update our support videos. We hope you find these helpful! Enjoy!
Four Wheel Campers Website: https://fourwheelcampers.com/videos/
YouTube Channel: https://www.youtube.com/c/FourWheelCampers1
Owner’s Manual
An up-to-date digital version of the Owner’s Manual is available on our website under the Support section. https://fourwheelcampers.com/owners-manuals-for-pop-up-truck-bed-campers/
This manual doesn’t cover every detail of all Four Wheel Campers models. Owners should read it carefully, along with the manuals for individual components included in the Owner’s Information Package. Ultimately, it’s up to the owner to fully understand how to safely and properly use the camper before operating it.
Some features or equipment shown may be optional or not available on all models. Because we’re always working to improve our products, some updates may not be reflected in this manual. The instructions are meant as a general guide and do not change or extend the manufacturer’s limited warranty.
Community & Events
FWC has a robust, active owner’s community that is friendly and welcoming. The FWC community is great was to get info, get inspired and connect with like minded people.
- FWC Events: https://fourwheelcampers.com/events
- Owner Rally: Each year FWC hosts an owner’s rally.
- FWC Facebook Groups
- Four Wheel Campers Owners: https://www.facebook.com/groups/FourWheelCampersOwners/
- Used Four Wheel Pop-Up Campers: https://www.facebook.com/groups/617560256689530/
Service Appointments
To make a service appointment at the factory in Woodland, CA, please call our service department at 530-666-1442. Service appointments must be made in advance. All FWC dealers are authorized repair shops as well, please contact a local dealer for more information.
Legal
WARNING! DO NOT RIDE IN CAMPER DURING VEHICLE MOVEMENT
California Vehicle Code § 23116(a) and (b) prohibit any person from riding in or on the back of a pickup truck or flatbed motortruck while it is being driven. A camper is considered part of the truck bed; therefore, passengers must not ride in the camper during transit.
All occupants aged 16 or older in a moving vehicle must be properly restrained by a safety belt under Vehicle Code § 27315. Campers are not equipped with seat belts or anchorage meeting FMVSS standards; attempting to ride without a certified restraint system may result in serious injury or death.
CALIFORNIA PROPOSITION 65 WARNING
WARNING: This product can expose you to chemicals including phthalates and bisphenol A, known to the State of California to cause cancer and reproductive harm. For more information, visit www.P65Warnings.ca.gov.
TIRE & LOADING INFORMATION
This camper is certified to meet all applicable Federal Motor Vehicle Safety Standards. The following information must be permanently affixed on the entry door frame:
- GVWR: [insert lbs/kg]
- GAWR Front/Rear: [insert lbs/kg]
- Occupant + Cargo Capacity: [insert lbs/kg]
Refer to the vehicle placard and your tow vehicle’s owner’s manual for safe cargo load limits.
REPORTING SAFETY DEFECTS
If you believe that your camper has a defect which could cause a crash or could cause injury or death, you should immediately inform the National Highway Traffic Safety Administration (NHTSA) in addition to notifying Four Wheel Campers. If NHTSA receives similar complaints, it may open an investigation, and if it finds that a safety defect exists in a group of campers, it may order a recall and remedy campaign. However, NHTSA cannot become involved in individual problems between you, your dealer, or Four Wheel Campers.
FWC Team Contact Information
Quick contact guide for FWC team and dealers as of 2026. Most up to date information is available on the FWC website. Always feel free to reach out for support!
|
Name |
Location |
Phone Number |
Website |
|
Four Wheel Campers - Headquarters |
CA - Woodland |
530-666-1442 |
|
|
FWC Service Team |
CA - Woodland |
530-666-1442 |
|
|
FWC Parts Team |
CA - Woodland |
530-666-1442 |
|
|
Four Wheel Campers - SoCal |
CA – Greater LA Area |
909-870-1610 |
|
|
Four Wheel Campers - San Diego |
CA - Vista |
760-996-5764 |
|
|
|
|||
|
Mule Expedition Outfitters |
AZ - Prescott Valley |
928-800-1349 |
|
|
Off-Grid 4x4 |
CO - Fredrick |
720-413-1311 |
|
|
AVO Jax |
FL - Jacksonville |
844-667-3687 |
|
|
Commonwealth 4x4 |
KY - Lexington |
859-697-2082 |
|
|
Adventure Motors |
MO - Grandview |
816-824-4892 |
|
|
Four Wheel Campers Jackson Hole |
ID - Boise |
208-500-9476 |
|
|
Main Line Overland |
NC - Charlotte |
844-656-7626 |
www.mainlineoverland.com |
|
Main Line Overland |
NH - Bow |
844-656-7626 |
www.mainlineoverland.com |
|
Mule Expedition Outfitters |
OR - Tualatin |
503-878-4417 |
|
|
Main Line Overland |
PA - West Chester |
844-656-7626 |
|
|
Four Wheel Campers Jackson Hole |
MT - Bozeman |
307-690-7404 |
|
|
CB Adventure Supply |
TX - Fort Worth |
817-330-4466 |
|
|
Expedition Superstore |
UT - West Valley City |
801-871-0569 |
|
|
Mule Expedition Outfitters |
WA - Issaquah |
425-394-1111 |
|
|
Go Anywhere |
WI - Eagle |
262-370-4255 |
|
|
Four Wheel Campers Jackson Hole |
WY - Jackson |
307-690-7404 |
|
|
|
|||
|
Overland Outfitters |
Canada - British Colombia |
778-547-2444 |
|
|
Montera |
Canada - Quebec |
450-266-1234 |
|
|
Wohnkabinencenter |
Germany |
49(0) 2332 83609 |
|
|
Japan |
Japan |
886-2-86916350 |
|
Quick Camp Guide
Camper Basics
https://youtu.be/1-duwk8GJkA?si=nkIPU1JXpzKU7zsw
- Before leaving to Camp:
- Plug in camper to charge batteries, make sure the master kill switch is in the out/on position.
- Turn on the refrigerator overnight to pre-cool before loading contents.
- Fill freshwater tank.
- Check and fill propane tanks if necessary.
- Ensure all systems function properly and camper is properly secured to truck bed.
- Setting Up Camp:
- Unlatch all 6 roof latches (limited campers may have 5 latches).
- Turn on propane.
- Open grey water drain and attach hose/bag.
- Pop the top.
- Enjoy!
- Leaving Camp:
- Secure/put away all items in camper and close all windows and vents.
- Turn off appliances, lights and close the lids of sink/stove.
- Attach bungees across inside windows and lower the pop top.
- Put away grey water system.
- Turn off propane.
- Latch all 6 roof latches (limited campers may have 5 latches).
- Storing Camper:
- Air out and dry out camper before storage.
- Empty freshwater tank and follow winterizing instructions if storing during winter
- Turn off all appliances.
- Wipe down all surfaces.
- Empty, clean and dry refrigerator. Leave cracked open.
- Turn off camper power by pushing in the 12V master kill switch.
- If storing in damp winter conditions, remove thermal pack and mattress. Periodically pop-up camper and air out.
Camper Info & Tips
- Batteries
- Before leaving on a trip ensure that the camper batteries are fully charged.
- Refrigerator
- Typical setting is 3.5 on the dial depending on conditions.
- In temps over 85:
- Put only cold items into fridge and a full fridge is an efficient fridge.
- Turn on refrigerator vent fan on switch board and park fridge on shady side of truck.
- Water
- Camper can be filled with 20 gallons of fresh water.
- Ensure only potable water goes into the system.
- Water fill is located on outside of the camper behind small locked access door. Use the larger of the fill ports.
- Propane
- Be sure that propane tanks are closed during travel.
- Propane tanks can be filled at many gas stations, U-Haul locations or most propane suppliers.
- Heater/Furnace
- Be sure to crack a vent or window to provide adequate air flow.
- Turn off when traveling.
- Cold Weather
- In freezing temps, camper should be winterized following included instructions, with no water in the system
- Condensation may occur in some conditions, be sure to wipe down surfaces. Air out camper when possible, to keep things fresh.
Your Camper
Serial Number/Camper ID
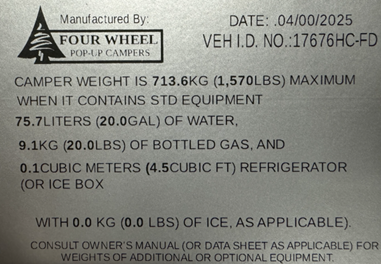
Every new Four Wheel Camper is assigned a unique serial number. The ID tag sticker is normally located on the upper rear passenger side corner of the camper, and on the exterior of the rear wall. On the Flatbed Models the ID tag sticker is located on the front passenger side exterior wall. There will also be a duplicate Camper ID tag in an interior cabinet.
The ID tag sticker has the serial number of your camper, manufacture date, dry weight, and other information.
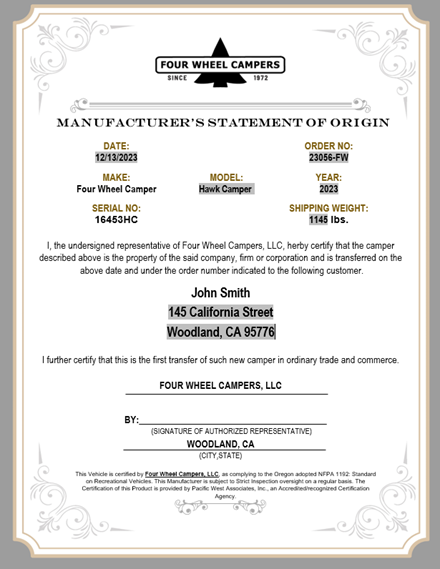
MSO (Manufacturer’s Statement of Origin)
Every new Four Wheel Camper will come with an MSO aka Manufacturer’s Statement of Origin. This is printed and enclosed in the new owner’s packet provided during camper installation. The MSO is typically used for proof of ownership, for resale, for insurance, and for state vehicle registration purposes.
If camper is sold, use the back side of the MSO to transfer the title of ownership to the new buyer.
Component Manufacturer Warranty & Info
Each camper will receive a new owner’s packet during camper install. Manufacturer operating manuals are included, each with their own warranty information. Review the contents and operate these appliances according to the procedures provided in each manual.
Limited Warranty Information
Valid for and only applies to Four Wheel Campers’ truck campers and toppers purchased and used inside the United States and its territories or possessions.
Who May Use this Warranty? This limited warranty extends to the original consumer purchaser only. It does not extend to any subsequent owner or other transferee of the truck camper or topper.
What Does this Warranty Cover? Subject to the exclusions below, Four Wheel Campers warrants that the truck camper or topper sold to the original purchaser will be free from defects as follows:
- Defects in materials, workmanship and the supporting structure of the truck camper and topper, for one (1) year from the date of original purchase.
- Defects in materials and workmanship affecting the structural integrity of the aluminum sidewalls, aluminum framework, floor, and roof of the truck camper and topper, for five (5) years from the date of original purchase.
- Defects in materials and workmanship in the vinyl pop-up enclosure (soft sides) of the truck camper and topper, for a period of five (5) years from the date of original purchase.
The warranty periods set forth above are collectively referred to herein as the “Warranty Period.”
The date of original purchase must be evidenced by a copy of the receipt and the Manufacturer’s Statement of Origin (MSO) from Four Wheel Campers.
What is Excluded from this Warranty? This limited warranty does not cover any damage due to: (1) normal wear and tear; (2) accident, abuse, misuse, neglect, or negligence; (3) the unauthorized modification or repair of the truck camper and topper; (4) use, maintenance or storage other than in accordance with Four Wheel Campers' use, maintenance and storage instructions, including the instructions contained in the Owner's Manual; (5) environmental conditions, including, but not limited to road salt, hail, windstorm, freezing, flooding, fire, or to any occurrence that might be termed an Act of God or Force Majeure; or (6) normal deterioration, fading or discoloration of fabric (including vinyl) and decorative items due to wear or exposure. Consumables such as batteries and similar items are likewise excluded from this limited warranty. Flaws considered to be cosmetic and not structural or affecting the integrity of the truck camper and topper may or may not be repaired or replaced at the discretion of Four Wheel Campers.
This limited warranty does not cover defects in materials and workmanship or any other damage to or caused by truck camper and topper components manufactured by companies other than Four Wheel Campers (example: refrigerators, furnaces, hot water heaters, awnings, roof racks, camper jacks, propane tanks, etc.) or any other product or device installed by you or any third party after the original date of purchase. Such component parts, products or devices may be warranted by their respective manufacturers.
If you need service or repair work on component parts, products or devices not manufactured by Four Wheel Campers, you must contact the manufacturer to have any service or repair work done. Included in the Four Wheel Campers Owner's Manual is a list of manufacturers of component parts originally included with your truck camper or topper, with contact information, and additional details for your convenience.
Four Wheel Campers is not responsible to any purchaser of the truck camper and/or topper for any undertaking, representation or warranty made by dealers during the course of selling the truck camper and/or topper beyond those herein expressed.
Each turnbuckle must be checked periodically to ensure the proper tension is applied. It is VERY IMPORTANT to regularly check & tighten them to ensure no damage is done to your truck or camper/topper. If turnbuckles are not properly adjusted Four Wheel Campers assumes no liability in potential damage to your truck or camper/topper.
What are the Remedies Under this Warranty? FOUR WHEEL CAMPERS' SOLE OBLIGATION AND ENTIRE LIABILITY UNDER THIS LIMITED WARRANTY SHALL BE, AT FOUR WHEEL CAMPERS' OPTION, EITHER THE REPAIR OR REPLACEMENT OF THE TRUCK CAMPER/TOPPER OR THE PARTS THEREOF THAT ARE DEEMED DEFECTIVE BY FOUR WHEEL CAMPERS, AND FOR WHICH FOUR WHEEL CAMPERS IS NOTIFIED DURING THE WARRANTY PERIOD. FOR PURPOSES OF CLARITY, NO PAYMENT OR OTHER COMPENSATION WILL BE MADE FOR INCIDENTAL EXPENSES, INCLUDING, BUT NOT LIMITED TO, TOWING, TELEPHONE, TRANSPORTATION, LODGING, TRAVEL, GASOLINE, LOSS OF PAY OR INDIRECT OR CONSEQUENTIAL DAMAGE INCLUDING, BUT NOT LIMITED TO, LOSS OF USE OF THE TRUCK CAMPER, INCONVENIENCE, DAMAGE OR INJURY TO PERSON OR PROPERTY, OR LOSS OF REVENUE, WHICH MIGHT BE PAID, INCURRED OR SUSTAINED BY REASON OF ANY DEFECT COVERED BY THIS LIMITED WARRANTY.
UPON RECEIPT OF THE DEFECTIVE ITEM IN QUESTION, FOUR WHEEL CAMPERS WILL INSPECT THE ITEM AND, IF REQIRED UNDER THIS WARRANTY, WILL ATTEMPT TO REPAIR OR REPLACE THE ITEM WITHIN THIRTY (30) DAYS. HOWEVER, THERE MAY BE DELAYS BEYOND FOUR WHEEL CAMPERS’ CONTROL, IN WHICH CASE THAT TIME PERIOD MAY BE EXTENDED AS REASONABLY NECESSARY.
How Can You Obtain Warranty Services? Upon discovery of a defect, you must promptly notify Four Wheel Campers or the authorized dealer from whom you purchased the truck camper in order to request a service appointment. If it is not possible to return the truck camper/topper to the Four Wheel Campers factory or your selling dealer, please call the Four Wheel Campers factory service department. Four Wheel Campers will use reasonable efforts to work with you on finding another possible location to have the truck camper/topper repaired (depending on what the problem might be). However, Four Wheel Campers retains ultimate discretion in selecting the designated service center.
As part of obtaining warranty services at the designated service location, you will be required to provide your name, address and telephone number, proof of purchase, a description of the defect, and any claims number issued to you by Four Wheel Campers.
Warranty repairs may only be performed at a service location designated by Four Wheel Campers, which may include the Four Wheel Campers factory, a Four Wheel Campers authorized dealer, or another service center approved in writing by Four Wheel Campers. Warranty repairs by a non-Four Wheel Campers dealer or service center must be approved by the Four Wheel Campers factory service department PRIOR to any work being started.
In order to obtain warranty services, please contact: Four Wheel Campers, using the following contact information: FWC Service Department: (530) 666-1442 OR The Four Wheel Campers authorized dealer from whom you purchased the truck camper/topper, using the contact information for your authorized dealer included as part of your Owner’s Manual.
Disclaimer and Limitation of Liability Any descriptions, drawings, specifications, samples, models, bulletins, or similar material, used in connection with the sale of the truck camper shall not be construed as an express warranty that the truck camper will conform or comply with your requirements.
EXCEPT FOR THE LIMITED WARRANTY DESCRIBED ABOVE, THERE ARE NO OTHER WARRANTIES MADE BY FOUR WHEEL CAMPERS ON ANY COVERED TRUCK CAMPER. NO ORAL OR WRITTEN INFORMATION OR ADVICE GIVEN BY FOUR WHEEL CAMPERS, ITS DEALERS, AGENTS, OR EMPLOYEES SHALL CREATE A WARRANTY OR IN ANY WAY INCREASE THE SCOPE OF THIS WARRANTY, AND YOU MAY NOT RELY ON ANY SUCH INFORMATION OR ADVICE. THIS WARRANTY GIVES YOU SPECIFIC LEGAL RIGHTS, AND YOU MAY ALSO HAVE OTHER RIGHTS WHICH VARY FROM STATE TO STATE AND COUNTRY TO COUNTRY. FOUR WHEEL CAMPERS LIMITS THE DURATION OF ANY LEGALLY IMPLIED WARRANTIES INCLUDING IMPLIED WARRANTIES OF MERCHANTABILITY OR FITNESS FOR A PARTICULAR PURPOSE, TO THE DURATION OF FOUR WHEEL CAMPERS' EXPRESS WARRANTY. SOME STATES AND COUNTRIES DO NOT ALLOW LIMITATIONS ON HOW LONG AN IMPLIED WARRANTY LASTS, SO THE ABOVE LIMITATION MAY NOT APPLY TO YOU. NEITHER FOUR WHEEL CAMPERS NOR ANYONE ELSE WHO HAS BEEN INVOLVED IN THE CREATION, PRODUCTION, OR DELIVERY OF THE TRUCK CAMPER SHALL BE LIABLE FOR ANY DIRECT, CONSEQUENTIAL, OR INCIDENTAL DAMAGES (INCLUDING DAMAGES FOR LOSS OF BUSINESS PROFITS, BUSINESS INTERRUPTION, LOSS OF BUSINESS INFORMATION AND THE LIKE) ARISING OUT OF THE USE OF OR INABILITY TO USE THE TRUCK CAMPER, EVEN IF FOUR WHEEL CAMPERS HAS BEEN ADVISED OF THE POSSIBILITY OF SUCH DAMAGES. SOME STATES AND COUNTRIES DO NOT ALLOW THE EXCLUSION OR LIMITATION OF INCIDENTAL OR CONSEQUENTIAL DAMAGES, SO THE ABOVE LIMITATION OR EXCLUSION MAY NOT APPLY TO YOU.
IN THE EVENT THAT ANY OF THE ABOVE LIMITATIONS ARE HELD UNENFORCEABLE, FOUR WHEEL CAMPERS' TOTAL AGGREGATE LIABILITY FOR ANY DAMAGES TO YOU OR ANY THIRD PARTY SHALL NOT EXCEED THE PURCHASE PRICE YOU PAID, REGARDLESS OF THE FORM OF ANY CLAIM. THIS LIMITED WARRANTY IS GOVERNED BY THE LAWS OF THE UNITED STATES OF AMERICA AND THE STATE OF CALIFORNIA. THIS LIMITED WARRANTY IS VALID FOR AND ONLY APPLIES TO PRODUCTS PURCHASED AND USED INSIDE THE UNITED STATES (AND ITS TERRITORIES OR POSSESSIONS).
Installation
Depending on the type of camper and truck, attachment points and installation instructions will vary.
Warning! Always ensure the camper is securely fastened to the truck before driving. An improperly attached camper can cause serious injury and significant damage to both the truck and the camper. Check that all mounting hardware is correctly adjusted and tightened as specified. Four Wheel Campers, LLC is not responsible for any damage or injury resulting from improper installation or maintenance.
Attachments Using Turnbuckles
- Standard Attachment: Standard camper attachment for slide-in campers uses 4x eyebolts with backing plates and washers, installed near each corner of the bed of the truck. Turnbuckles connect the eyebolts to camper.
- Mounting Bars for Composite Beds: For trucks with composite beds (2005 or newer Toyota Tacoma’s and 2022 or newer Toyota Tundra’s) require special mounting bars or a combination of the mounting bars and eyebolts. Turnbuckles connect the mounting bars in truck bed to camper.
- External Tie Downs: Some mid-sized trucks can only be attached with external tie downs. The tie downs attach via truck frame to camper jack mounts via large springs or turnbuckles. Follow external tie down manufacturer instructions.
- Turnbuckle Instructions: Turnbuckles connect from truck bed or bed bars to camper mounting brackets.
- Each turnbuckle must be checked periodically to ensure that the camper is securely attached to truck
- There are 2x front and 2x rear turnbuckles. All 4 are located via access doors from inside the camper and will be located near the floor under cabinets or under seating.
- Each turnbuckle has an up position. Up position will have 2 raised lines near the top hook. By ensuring each turnbuckle is facing upward, the turn direction to tighten turnbuckle will be consistent.
- Twist/Turn the aluminum turnbuckles to either tighten or loosen the connection between the tie down brackets on the camper, and the eyebolts or bed bar in the bed of truck.
- Each turnbuckle needs to be hand tight, and then a half turn to a full turn tighter using a lever, such as a screwdriver
- Some campers may be equipped with turnbuckles that have a locking pin. Insert locking pin to secure turnbuckle or remove locking pin to loosen turnbuckle.
- The first few times traveling with camper, the turnbuckles might loosen, be sure to check the tension on all four turnbuckles to make sure they are tight. If a turnbuckle is loose, check to ensure the camper is still square on the bed of truck. Once the camper is square, tighten the front turn buckles first, and then tighten the rear set of turnbuckles.
- It is recommended that turnbuckles be checked at least once per day while driving on smooth roads, and sometimes twice a day when driving on curvy, rough or washboard roads to ensure they have not loosened.
- If turnbuckles are not properly adjusted & tightened as recommended, Four Wheel Campers LLC assumes no liability for potential damage to truck or camper.
Attachments Using Bolts
Some mid-size trucks and all flatbed campers must be attached via 4-6 through-bolts. Bolt locations will vary based on camper and floorplan.
- Bolt Down Instructions:
- Each bolt must be checked periodically to ensure the proper tension is applied. It is VERY IMPORTANT to regularly check your bolts to ensure no damage is done to truck or camper.
- 3/8 bolts are used along with washers and nyloc nuts in holes drilled through your camper and truck bed or flatbed tray. Bolts should be tightened to 9 ft. lbs. using a torque wrench or if washer can spin it needs to be tightened.
- DO NOT OVER TIGHTEN the bolts, ensure they are snug.
- If bolts are removed, a new nyloc nut should be used (standard 3/8 coarse thread).
- The first few times traveling with camper, the bolts might loosen, be sure to check the tension on all four bolts to make sure they are tight. If a bolt is loose, check to ensure the camper is still square on the bed of truck. Once the camper is square, tighten the front bolts first, and then tighten the rear set of bolts.
- It is recommended that bolts be checked at least once per day while driving on smooth roads, and sometimes twice a day when driving on curvy, rough, or washboard roads to ensure they have not loosened.
- If the bolts are not properly adjusted & tightened as needed, Four Wheel Campers LLC assumes no liability for potential damage to truck or camper.
Mechanical Camper Jacks
The Mechanical Jacks are used to raise and lower the camper for mounting and dismounting the camper on the truck.
- The mechanical camper jacks attach to each corner jack bracket using provided bolts, a socket and wrench.
- Each camper with the Mechanical Jacks option is delivered with a manual hand crank and a drill adapter to raise and lower the jacks.
- A cordless drill can be used with the provided drill adaptor to raise or lower jacks.
- Warning! It is very important to proceed slowly at the very end of the extension or retraction of jack to avoid a hard stop. Abruptly stopping may cause drill to whip around suddenly and may cause injury or damage the jack.
- FWC does not recommend driving with jacks mounted to camper.
- Warning! Travel with jacks mounted to camper could cause damage to camper if jacks get hit or caught on another object/vehicle.
How to Unload a Camper
Required tools: 4x Mechanical camper jacks w/ hand crank or drill bit adaptor, drill (optional), 9/16 socket, 9/16 wrench, lever (screwdriver), floor support for camper storage and a friend (optional)
- When choosing a location for unloading the camper, select flat & firm ground.
- Warning! Uneven or slopped ground can create unstable conditions.
- From inside the camper remove all turnbuckles (4) or bolts (4-6, size dependent).
- If slide in camper with turnbuckles, all 4 turnbuckles are located via access doors from inside the camper and will be located near the floor under cabinets or under seating. Use lever (screwdriver) if needed to loosen turnbuckles.
- If flatbed camper or slide in with bolts, the bolts will be located under seating, on floor, under front cabinet or propane cabinet.
- Attach 4x mechanical camper jacks to each corner jack bracket using provided bolts, a socket and wrench.
- Lower the 4x jack base pads to the ground using the crank or drill bit adapter and be sure that the pads have solid footing to prevent tipping or sinking.
- Continue lowering the front two camper jacks so the front of the camper raises up 3-4” off the truck bed.
- Lower the rear camper jacks 3-4” so the entire camper is no longer touching the truck bed.
- Repeat front and rear lifting until camper is 4-6” above truck bed.
- Visually ensure the camper is high enough and there are no obstructions that will prevent truck from pulling out safely.
- Unplug truck to camper wiring:
- Drive truck slowly forward about 12”.
- Park and engage emergency brake.
- Unplug truck to camper wiring near front driver or passenger side.
- Drive the truck straight forward until completely free of the camper, taking care not to hit or rub the camper jacks, wheel wells, or tailgate opening.
- To store camper:
- Lower camper using the jacks until the camper is as close to the ground as possible.
- It’s best to store camper on supported surface such as rolling cart, saw horses, X supports or another type of base. Keep jacks on for additional support points.
- Warning! Tipping hazard!
- Do not store the camper on jacks when the jacks are raised, and the camper is standing high up in the air without support.
- FWC does not recommend use of camper while stored on jacks and not firmly attached to a truck.
How to Load a Camper
Required tools: 4x Mechanical camper jacks w/ hand crank or drill bit adaptor, drill (optional), 9/16t socket, 9/16 wrench, lever (screwdriver) and a friend (optional)
- When choosing a location for loading the camper, select flat & firm ground.
- Warning! Uneven or slopped ground can create unstable conditions.
- Raise the 4x jack base pads from the ground using the crank or drill bit adapter and be sure that the pads have solid footing to prevent tripping or sinking.
- Raise the front two jacks about 3-4”.
- Then raise the rear two jacks until the camper is level with the front.
- Always be sure that the front jacks are never lower than the rear jacks; they must always be level with, or higher than the rear.
- Repeat front and rear lifting until camper is 4-6” above truck bed.
- Visually ensure the camper is high enough and there are no obstructions that will prevent truck from backing in safely.
- Line up truck bed with front of camper. It helps to have a partner to guide while backing up.
- Reverse truck straight backward, taking care not to hit or rub the camper jacks, wheel wells, or tailgate opening.
- Check frequently to ensure camper is centered and not going to run into the truck bed.
- Plug in truck to camper wiring:
- Reverse truck until camper is about 12” from front of truck bed.
- Park and engage emergency brake.
- Plug in truck to camper wiring near front driver or passenger side.
- Finish backing truck under camper until front camper bumpers align with and touch front of truck bed.
- Check that camper is sitting square on truck bed. If needed, jacks can be kicked to shimmy camper into correct position.
- Lower front camper jacks first. This will allow the camper to be snug against front of truck bed.
- Lower rear jacks.
- From inside the camper reattach all turnbuckles (4) or bolts (4-6) following instructions in the “Attachments” section above.
- If slide in camper with turnbuckles, all 4 turnbuckles are located via access doors from inside the camper and will be located near the floor under cabinets or under seating.
- If flatbed camper or slide in with bolts, the bolts will be located under seating, on floor, front cabinet or propane cabinet.
- Remove and store jacks in dry location.
Truck to Camper Wiring
To allow for the camper battery(s) to charge while driving, the 12v truck to camper wiring starts at truck battery, protected by a MIDI fuse, and is secured under truck framing to Anderson SB50 or SB75 connector plug near front of truck bed, then enters the camper at the front corner through the floor pack or through front wall on flatbed models and terminates at a MIDI fuse or MEGA fuse located inside the camper. Wiring also includes marker light connection for full size campers (Raven, Hawk, Grandby).
Trucks equipped with smart or load sensing alternators will have an additional 14awg yellow cable spliced into an ignition hot circuit on the truck using a fuse tap. This will allow the DC/DC charger to effectively charge the camper despite the voltage fluctuations caused by a smart alternator.
Hawk+ Flatbed campers with RedArc Manager Alpha75 power system will ship with charging profile downgraded to 30 amps. Charging profile should match capacity of truck alternator and can be adjusted using RedVision display.
Wires and components:
- 8 AWG Positive/Negative Wires: For standard camper power systems with 25 amp BCDC charger
- 6 AWG Positive/Negative Wires: Only if camper is equipped with Manager 30 system or 40 amp BCDC charger
- 1/0 AWG Positive/Negative Wires: Only if camper is equipped with Manager Alpha75 system
- Green 14 AWG Marker Light Wire: Only for full size campers - Raven, Hawk or Grandby
- Yellow 14 AWG Ignition Trigger Wire: Only if truck is equipped with Smart Alternator
- MIDI Fuse or MEGA Fuse (only for Manager Alpha75 system)
- Anderson SB50 Connector or SB175 Connection (only for Manager Alpha75 system)
- DCDC w/ Battery Separator and Solar Controller: For standard camper power systems, the function of the DCDC w/ battery separator is to disengage the truck battery when the truck is turned off, therefore keeping the truck battery fully charged
- Manager 30 or Manager Alpha75: For advanced power systems, the Manager systems are total managers for all incoming or outgoing power of camper system
Safety
Always have a clear emergency escape plan and make sure everyone using the camper understands it. Ensure all occupants know the location of the emergency escape and how to use it properly. Never ignore a safety alarm—if one sounds, evacuate the camper immediately. Before traveling, check that all safety device batteries are fully charged and functioning.
Propane/ Carbon Monoxide Detector (LP/CO Detector)
Warning! Never ignore the sound of a detector alarm! If there is a detector warning of a potential emergency:
- Turn off all gas appliances.
- Exit the camper immediately and leave door/windows open.
- Close the propane tank.
- Do not re-enter the camper until the camper has been aired out and alarm returns to its normal condition.
- Determine source of leak and have all systems checked by qualified RV repair shop, call FWC or call local FWC dealer.
Warning! Never block Propane/ Carbon Monoxide Detector (LP/CO Detector).
- Propane (LP Gas)
- Used for stove, furnace, and water heater in camper.
- Highly explosive at concentrated levels.
- Heavier than air, so it settles near the floor.
- Has a sulfur-like smell to help detect leaks.
- Carbon monoxide (CO) is a colorless, odorless, and poisonous gas. It is formed when incomplete combustion of fuels such as gasoline, natural gas, propane, oil, and wood occurs.
- The following are symptoms of Carbon Monoxide poisoning:
- Mild Exposure: Slight headache, nausea, vomiting, fatigue (Flu like symptoms)
- Medium Exposure: Severe throbbing headache, drowsiness, confusion, fast heart rate
- Extreme Exposure: Unconsciousness, convulsions, heart and lung failure, brain damage, and death
- Both gases are known to be found in recreational vehicles and the proper detection of these gases via installed LP/CO detector provides a safe environment for the occupants of the camper.
- Always ventilate camper when using any propane. Crack a vent or window!
- Read and follow the instructions on LP/CO Detector label and in manufacturers owner’s manual.
- Detector should be replaced after 5 years from original camper install date.
- Detector indicators:
- Normal: no sound | steady green light
- CO alarm: 4 “beeps” 5 seconds off | steady red light
- Propane alarm: constant beeping | flashing red light
- Alarm malfunction: “beep” every 30 seconds | alternating red/green
- End of life: beeps every 25-30 seconds | red red green green flashing lights
- Warm up cycle (about 10 minutes): no sound | flashing green light
- Detector Testing: Test the alarm operation after the camper has been in storage, before each trip, and at least once per week during use. Unit must be powered for 10 minutes before test can be performed. The test/reset button tests all electrical functions of the alarm. It does not check the sensor operation.
- The test/mute switch is located on the front of the alarm. Press and hold the test button for 1 second. The alarm is working properly if the green indicator light changes color to red and the beeps 4 times. The gas LED should also blink red.
- Leak Testing: After connecting propane tanks, apply a soapy-water solution to all fittings. Bubbles indicate a leak—do not operate until repaired.
- Maintenance: Vacuum the detector with a soft brush attachment to remove collected dirt and dust every month. Keep the detector away from chemical sprays and solvents which may compromise the detectors’ functions. Do not paint the detector.
- The following are symptoms of Carbon Monoxide poisoning:
Smoke Detector
Every camper comes equipped with a smoke detector, located inside the camper.
- Read and follow the instructions on smoke detector label and in manufacturers owner’s manual.
- The smoke detector uses one 9 volt battery.
- To test smoke detector:
- Long press test button, then alarm will sound.
- Test should be performed after the camper has been in storage, before each trip, and at least once per week during use.
Fire Extinguisher
Every camper comes equipped with a Kiddie Fire Extinguisher, located inside the camper near the entrance door.
- Read and follow the instructions on fire extinguisher label and in manufacturers owner’s manual.
- Inspect the extinguisher at least once a month.
- Check the extinguisher is charged. If the extinguisher has a gauge, check the pointer is within the green section.
- Be sure that the lock pin and tamper seal are intact and in place.
- Check for dents, scratches, corrosion or any other damage.
- Check the discharge nozzle. Make sure it is clean and free of obstructions.
- Discharge and discard after any use.
- Warning! Never test extinguisher by partially discharging. Loss of pressure will occur and render the extinguisher ineffective. It MUST be replaced immediately.
How to properly use a fire extinguisher, use the PASS procedure:
- To use a Kidde fire extinguisher, follow the PASS procedure:
- Pull: Pull the pin and hold the extinguisher upright with the nozzle away from you
- Aim: Aim the nozzle at the base of the fire and stand back
- Squeeze: Squeeze the lever slowly and evenly to discharge the extinguishing agent
- Sweep: Sweep the nozzle from side to side, moving toward the fire
- You can find the instructions printed on the extinguisher cylinder.
- Fire extinguisher should be replaced immediately after use or discharge.
Emergency Exit Window
Every camper comes equipped with one emergency exit window. The emergency exit window provides an escape route in case your camper must be evacuated under emergency conditions and the path to the main entry door is blocked.
Warning! Never block the emergency exit window
- Emergency exit window will have labeling and special red markings.
- Large Window 19x56
- To operate the emergency exit window, open window latch then slide glass window with screen to the side.
- Small Window 19x26
- To operate the emergency exit window remove screen, pull the red handle(s) and swing the window outward. The window is hinged at the top.
Glass and Glazing Materials
All glazed openings—including windshield, entry-door window, slide-out windows, rear window, and any interior partition—shall be safety glazing materials conforming to Federal Motor Vehicle Safety Standard No. 205, Glazing Materials (49 C.F.R. § 571.205), which incorporates ANSI/SAE Z26.1-1996 performance and marking requirements.
Inspect all glazing quarterly for cracks, chips, or delamination. Replace any damaged pane only with safety glazing materials meeting FMVSS 205. Replacement glazing must be sourced from OEM or FMVSS-compliant aftermarket suppliers.
Pop Up
Gas Strut Lift Assist
The 4x exterior gas strut roof lift assists are installed on the outside of the camper, one set in the front and one set in the rear. They are used to help raise and lower the camper roof.
- The strut pressure will vary from 30-60 lbs. depending on the size of the camper and roof mounted options.
- Struts typically need to be replaced every 2-5 years depending on conditions. Replacements can be ordered from the FWC Parts Dept. or local FWC dealer.
- Too high of poundage will make it difficult to lower the roof.
Warning! The exterior gas strut roof lift assists are not intended to increase the roof weight load capacity. If a customer has heavy items on the roof, we recommend that the gear be removed from the roof before trying to raise & lower the camper roof. FWC does not recommend more than 100lbs. of gear on the camper roof at any one time.
Raising & Lowering the Roof w/ Exterior Struts
Raising the Roof
- Release all 6 (5 in select models) roof latches located around the perimeter of the camper. The cam latches (roof latches) are released by pulling the latch handle downward, which releases the tension between the roof bracket and the latch connector. Pull down on the roof slightly and pull the latch connector off and away from the roof bracket. The latch connector will now be resting against the latch handle in a down position.
- Warning! Ensure that the latch connector does not stay hooked to the roof bracket. If the latch is still connected the roof frame can be bent, creased, or otherwise damaged as the roof is pushed upward. If there is pressure when trying to lift the roof, go out and check that all latches are unlatched!
- Open the camper door to allow the camper to fill with air as the roof is raised. If the door is left closed, it will create an airtight vacuum and will make lifting the camper roof VERY difficult to pop up.
- Raise rear of roof
- Stand at rear of camper near the rear lift panel with door open.
- Pushing slightly upward on the rear folding panel, release the barrel latch that supports the end panel when the roof is down. Watch fingers!
- Place one hand on the rear horizontal wooden push board which is located on the ceiling and push the roof upward, at the same time, push up and outward on the lift panel with the other hand until the lift panel is extended vertically. It’s easiest to mostly push upwards on the wooden push board, instead of trying to push the black folding lift panel.
- Before the panel is all the way up, locate and pull the strap free from behind the panel, then snap the panel into place vertically by wrapping strap around panel nob and snaping into place.
- Raise front of roof
- Stand facing cab of truck, at the front of the camper with bed slide in stowed position. Unbutton front push handle from storage position on ceiling.
- Place one hand on the front horizontal wooden push board which is located on the ceiling and push the roof upward, at the same time, grasp the push handle and push forward until the lift panels are fully extended and lock into place with the button strap around the end of the handle. It’s easiest to mostly push upwards on the wooden push board, instead of trying use the push handle.
- Remove and store the bungee cords that pull vinyl pop up material inward.
Lowering the Roof
- Prepare camper: Clear all objects from counter tops and bed, lose stove & sink covers, close fan cover(s), and turn off all lights.
- Close all window flaps on the inside of the camper. Run fingers, pushing gently, along the side edges of each window along the welt that have the Velcro strips attached to them. Ensure a tight seal to keep any possible moisture from entering the camper while traveling. Attach bungee cords to window D rings, so that vinyl pulls in when roof closes.
- Open the camper door so the air inside the camper can be released as the camper roof comes down.
- Lower front of roof
- Unsnap the strap from the pull handle in front cabover bed area.
- Use push handle to slowly lower the front part of the roof by pulling the handle towards the center of the camper, and using the other hand on the front wooden push board to slow the roof from coming down too quickly.
- Lower back of roof
- Unsnap the strap that is around the knob on the rear folding panel.
- Place one hand on the rear wooden push board, then pull the knob on the folding panel down until the roof comes down on the rear. Keep one hand on the wooden push board to slow the roof from coming down too quickly and keep the other hand on the knob that is attached to the black folding panel.
- Be sure to keep hands and fingers clear to avoid getting pinched as the panel nears the fully closed position.
- Secure rear lift panel using barrel latch by slightly pushing up on the lift panel to align the hole.
- Close all 6 (5 in select models) roof latches located around the perimeter of the camper. The cam latches (roof latches) are engaged by attaching latch connector to roof bracket then pushing latch handle upward, which creates tension. Do not overtighten.
- Warning! Ensure that all latches are latched! If not, then pop up vinyl or roof may be damaged by driving at high speeds. You don’t want to be the one driving with your top up!!!
Pro Tip: There is an alternative method for raising or lowering the roof using the roof fan which many owners use. Close door and turn on roof fan with air sucking in to raise the roof or blowing out to lower the roof. Then proceed with raising or lowering each side of the roof lowering each side of the roof.
Warning! A HEAVY LOAD CAN FORCE THE ROOF TO COME DOWN VERY QUICKLY AND CAUSE INJURY OR CAMPER DAMAGE. Remove any snow load from the roof before lowering it.
Internal Lift Actuator
The optional internal roof lift actuator is installed on ceiling in line with camper aisle. Its motor is powered using a 12v plug. Each side is attached using a quick release pin along with a base for sturdy lifting.
Warning! DO NOT OVEREXTEND ROOF with actuator, this may cause damage to roof, vinyl or lift panels.
This option can be added to any existing Four Wheel Camper by placing order with FWC Parts Dept. or local FWC dealer.
- Follow above steps 1-3b for Raising the Roof w/ Exterior Roof Struts to unlatch 6 roof latches, open camper door and release front lift panel barrel latch.
- Plug in internal roof lift actuator using the 12v plug found in camper. Locate remote switch attached to plug cord.
- Raise back of roof
- Release front quick release pin of actuator to swing the actuator toward the rear floor of the camper.
- Attach provided support foot to bottom of actuator using pin from front of camper. This gives the actuator a stable surface for lifting. Ensure that actuator is aligned vertically.
- Press and hold switch to lift rear side.
- Before the panel is all the way up, locate and pull the strap free from behind the panel, then snap the panel into place vertically by wrapping strap around panel nob and snaping into place. Actuator may swing, so be careful.
- Raise front of roof
- Remove quick release pin from rear actuator mount and relocate actuator to front of camper actuator mounting location.
- Support foot should be vertical and may rest on front water compartment, storage compartment or floor.
- Unbutton front lift handle (also referred to as a push bar or push handle) from storage position on ceiling.
- Press and hold switch to lift front side.
- Before panel is all the way up, grasp the lift handle and push forward until the lift panels are fully extended and can be locked into place with the button strap around the end of the handle.
- Remove and store the bungee cords that pull vinyl pop up material inward.
- Lower the roof
- Warning! Actuator is not recommended to assist with lowering roof. Using it in that way may weaken actuator and/or cause failure.
- Follow above steps 1-6 for Lowering the Roof w/ Exterior Roof Struts.
Power System
12 Volt Power System
The camper runs from a 12v power system supplied via lithium battery(ies). Each camper comes with a power panel compartment which houses a 12v fuse block which will be next to the 120v circuit breakers & kill switch. Fuse labels are found on sticker list on compartment door. If a fuse blows, ensure replacement matches the required size.
12 Volt Power System - Kill Switch
Each camper has a 12v Battery Disconnect (Kill) Switch. It is a small silver push/pull knob near the 12v fuse panel & circuit breakers, so that all downstream loads are disconnected from the camper battery. Typically used during storage, the kill switch will keep small items inside the camper (ex: propane/carbon monoxide sensor) from draining the camper battery over time when the camper is not in use.
Standard Power System
- Kill switch will disconnect batteries from 12v power system but still allow for system to run on incoming 120v power from converter plugged into shore power.
- The “IN” (pushed in) position means 12v power is off and will NOT power appliances.
- The “OUT” (pulled out) position means 12v power on and WILL power appliances.
- To charge batteries from shore power, kill switch must be in out/on position.
Advanced Power Systems
- Kill switch will disconnect power system from any power source.
- The IN (pushed in) position means 12v power is off and will NOT power appliances or charge batteries.
- The OUT (pulled out) position means 12v power on and WILL power appliances and charge batteries.
120 Volt Power System
120v Power System is standard for all campers, but optional for Base model. This system allows for camper battery charging as well as running 12v Power System while plugged into 120v from an electricity source outside the camper via a 30amp power converter.
Each camper with a 120v system is equipped with a breaker panel for when camper is plugged into 120v shore power. If the camper is not connected to a 120v supply, the appliances will operate on 12v power from the camper battery(s). The 120v circuit breakers are located in the power supply cabinet next to the 12v fuses & kill switch.
All exterior and interior 120 V receptacles are GFCI-protected. Do not defeat GFCI devices. Before each season, press “Test” on each GFCI breaker and then “Reset” to verify functionality.
NOTE: 120V plugs will only function when connected to shore power or if camper is equipped with optional inverter.
Standard Power System: BCDC
- Victron Power Converter/Charge Controller & App
- Redarc BCDC with Solar Controller
- Victron Battery Monitor Display & App
- A Victron battery monitor comes standard in all campers and is bluetooth compatible. This monitors inbound and outbound wattage and amperage. Monitors battery voltage and % and lets you see time to empty.
- The display shows a net value for current and wattage, rather than separate values for charge/discharge. Example: If you have 10 amps of load (fridge, fans, lights), and 15 amps of solar charge coming in, the display would read a positive value of 5 amps. If your load grew to 20 amps with the same 15 amps of solar input, the display would read a negative value of 5 amps.
Advanced Power System
The Redarc Manager series is an all-in-one DCDC, solar, and shore power charger.
- Manager 30:
- The unit accepts all three forms of charge input and can utilize multiple input sources simultaneously to charge the camper battery. The unit prioritizes solar input first, and supplements charge to the camper battery with either truck charging or shore power input.
- TVMS Rogue:
- The TVMS Rogue acts as a switching hub for a majority of the camper accessories and allows switching from three sources: the TVMS display, a mobile device, and the physical switches in the camper. All lights accessible through the display are dimmable by pressing and holding the switch on the screen.
- RedVison Display & App:
- The RedVision display monitors and allows changes to all parameters of the manager and rogue units, as well as shows water tank levels and charge inputs. The display is also bluetooth enabled, and coupled with the Redarc app, allows a mobile device to act as a secondary display for monitoring and switching up to 50 feet away from the display.
- RedVison display will be programed by FWC to run connected equipment. Please reference Redarc User Manual for information on how to operate RedVision.
- NOTE: In cold climates, under 32F, the Manger system charge profile should be changed from lithium to AGM to overcome low temperature charging cut off of the Manager system. Battery discharge may also be effected.
- The AGM profile will only charge lithium batteries to around 90%.
- Once the switch has been made to the AGM profile, the display will reset and show “calibrating” until a full charge cycle is complete.
- Once temperature is above 32F, customers can switch back to the lithium profile and charge to 100% capacity.
Shore Power/120v Battery Charging/Power Converter
The main function of the converter is to convert shore power AKA 120V electricity to usable 12 volt power. Most electrical items and appliances inside the camper are designed to only run on 12 volt battery power with the exception of the 120v power plugs and a refrigerator. 120v power plugs will only function when connected to shore power or if camper is equipped with optional inverter. Max draw: 15 amp
Standard Power System
- BCDC equipped campers have a Victron IP22 30 amp charger which can be connected to a Victron App via Bluetooth.
Advanced Power Systems
- Redarc Manager 30 equipped campers have a built in 30 amp shore charger in the Manager. System can be connected to a Redarc App via Bluetooth.
To connect to shore power:
- Plug pigtail provided with camper starter kit to the 30amp connector.
- Using an outdoor extension cord, plug other end into a 120V outlet or a generator.
- Be sure the kill switch is in the Out position to charge battery(s).
Pro Tip: Plug camper into shore power the night before leaving on a trip to top off batteries and pre-cool refrigerator!
Batteries
The camper’s main source of power is the on-board lithium battery(s). The BCDC/IP22 or Manager systems help charge the batteries in stages via shore power, truck charging and/or solar charging. Bulk phase charges to 90% and absorption phase charges the remaining 10%.
High quality lithium batteries contain an internal battery management system, or “BMS”. This acts as the brain of the battery, and monitors multiple parameters to maintain the safety of the battery. The BMS will monitor under/overvoltage, under/over temperature, and over current situations. If any of these parameters reach a particular threshold, the BMS will “engage” and shut off the battery internally to stop and power transfer in or out of the battery. The most common instances of BMS engagement are as follows:
- Low temperature: The BMS will engage to prevent charge/discharge if the temperature is around freezing. On batteries with physical heating toggle switches, ensure that the heaters are in the on position to prevent the battery from shutting down in cold temperatures. Heater characteristics vary depending on the battery in the camper, but the main goal is the same: keep battery cell temperatures above 32F.
- Low voltage: If the battery is fully depleted, the BMS will engage and shut off battery to prevent excessive discharge. While lithium batteries can safely discharge to 0%, it is not recommended to discharge past 10-15% to avoid the risk of engaging the BMS. Most campers battery monitors can be set to sound an audible alarm at a specified state of charge, should the customer elect to enable this setting.
- If the BMS engages, the battery voltage will drop to a low 1-2 volt value and will need to be “woken up” by an incoming charge source once the underlying condition has been resolved (low temperature, low state of charge, etc). This can usually be accomplished by connecting to a shore power source. Allow battery to charge to 100%.
Battery Maintenance
Lithium batteries do best when stored at 50%-85% capacity. The lifespan of lithium batteries is lengthened if they do not rest for prolonged periods at low voltages or stored at full capacity. If storing the camper for an extended duration, please reference battery User Manual for information on how to properly store battery. Periodically check battery charge and top off as needed.
NOTE: The LP detector, appliance circuit boards and Truma CP Plus display maintain small parasitic draws while not in use. It is always best to make sure the battery kill switch is pushed in (OFF) when camper is not in use, or when the camper is in storage.
Inverter
Flatbed campers (not Hawk+ Flatbed) with optional inverter:
- Equipped with a Xantrex Prowatt SW 2000 inverter, capable of outputting 1800 watts of continuous true-sine 120V electricity to power AC appliances.
- The inverter is capable of outputting 2000 watts for up to 5 minutes for larger loads, and 3000 watts of surge power for items with heavy startup draw.
- NOTE: Always verify the associated draw of a given appliance before attempting to run off of the inverter.
- All 120V outlets are wired through the inverter, with the exception of the refrigerator outlet.
- Regardless of whether the camper is connected to shore power, the inverter must be on to power items connected to the outlets.
Slide in campers and Hawk+ Flatbeds with optional inverter:
- Equipped with a Xantrex Freedom X 2000 inverter, capable of outputting 2000 watts of continuous true sine 120V electricity to power AC appliances with 4000 watts surge.
- NOTE: Always verify the associated draw of a given appliance before attempting to run off of the inverter.
- Inverter includes a built-in transfer switch, which allows for the camper outlets to be directly fed by the shore power when connected, and to run off of inverter power when disconnected.
- Instead of one breaker panel with breakers for the converter, refrigerator, and outlets, Freedom X equipped campers will have two breaker panels. The first will be in the standard location, and will have a main breaker, along with a converter breaker and a breaker feeding the second panel. The second breaker panel is downstream of the inverter and feeds all other outlets.
Interior and Exterior Power Plugs
Interior 12v Power Plug Panel
- 12v Plug: Will function from camper batteries or when connect to shore power. Max draw: 15 amps
- USB Plugs: Will function from camper batteries or when connect to shore power.
- Starlink Switch: Turn on power to exterior DC port for Starlink.
Interior 120v Power Plugs
- 120v Plugs: Will only function when connected to shore power or if camper is equipped with optional inverter. Max draw: 15 amp
- Interior 120v receptacles are GFCI-protected. Do not defeat GFCI devices. Before each season, press “Test” on each GFCI breaker and then “Reset” to verify functionality.
Exterior USB/USBC Power Plug
- USB/USBC Plugs: Will function from camper batteries or when connect to shore power. Max draw: 5 amps
Exterior 120v Power Plug
- 120v Plug: Will only function when connected to shore power or if camper is equipped with optional inverter. Max draw: 15 amps
- Exterior 120v receptacles are GFCI-protected. Do not defeat GFCI devices. Before each season, press “Test” on each GFCI breaker and then “Reset” to verify functionality.
Exterior DC Port for Starlink Mini
- 5521 barrel jack connector stepped up to 24 volts to overcome voltage drop along 50ft Starlink mini cable. No adapters necessary to power Starlink Mini.
- Turn on switch found on Interior 12V Power Plug Panel.
Solar
Solar Pre-Wire
There are pre-wired solar plugs in two locations on the camper. On the roof is an MC4 connector which allows for roof solar panels to be added at time of installation, or at a later date. On the rear drivers side is an SAE plug for use of portable solar panels. Wiring is 8awg.
Solar Charge Controller
A Redarc BCDC or Manager System featuring a Maximum Power Point Tracking (MPPT) solar regulator, enables concurrent charging from both solar panels and the vehicle's alternator. Its 'Green Power Priority' function emphasizes solar charging, thereby minimizing the burden on the alternator. Positive solar wire terminates at DC/DC w/ Solar Controller or Manager System, negative solar wire goes to ground bar.
Roof Solar Panels
The optional Overlander Solar panels are attached to the center of the roof using a section of roof track and plugged into the MC4 connector. The panels come in 2x 80w, 2x 125W and 4x 125W configurations depending on camper size. Dual panels allow for better charging if one panel is obstructed. The panels start generating power as soon as there is visible light, which maximizes the total power over the day.
- Keep solar panels clean and free of obstruction for maximal solar power.
- Low light or winter conditions will effect the amount of solar generation.
Rear Solar & Portable Panels
The SAE solar plug installed on the rear wall of the camper allows for use of a portable solar panel. If more solar generation is needed or if parked in the shade, a portable panel can allow for added solar and different placement locations. The 8awg positive solar wire terminates at DC/DC w/ Solar Controller, negative wire goes to ground bar.
- NOTE: Check the + and - polarity of the portable solar panel to ensure it matches with SAE plug polarity.
- Total open circuit voltage of all solar connections needs to be less than 32V.
- Total solar output amperage not to exceed 20amps.
- Total solar watt input not to exceed 375 for the standard power system or 520W for the advanced power system.
Self-Installed Solar Panel Parameters
- Check polarity to ensure it matches with connector.
- Total open circuit voltage less than 32 volts.
- Total amperage no more than 20 AMPS.
- The BCDC w/ solar controller can take up to 375 Watts of total solar input. Manager 30 can take up to 520 watts of total solar input.
Warning! If attempting to self-install a solar system in a Four Wheel Camper, the customer assumes all responsibility for the correct wiring, polarity of wiring, and installation. It’s important to know how to use a voltmeter, basic wiring techniques & code, understand how to install in-lines fuses and check the polarity of the wiring. Every solar company uses different wiring and different polarity of solar plug connections. Four Wheel Campers, LLC will not be responsible for wiring shorts, solar panel shorts, or fried charge controllers due to incorrectly installed solar or wiring by the customer.
Lighting
Interior Lights
All campers are equipped with 4x LED ceiling lights and are individually controlled. Most campers (no Base Model) are also equipped with a floor light.
- To turn on an induvial ceiling light, press either white or amber button on light then press again to turn off.
- To turn on floor light, locate accessory switch panel just inside rear camper door and flip rocker switch.
Exterior - Porch Light
All campers come standard with an LED amber colored porch light. If an awning option is selected for a slide-in model, then an additional porch light is mounted under the awning.
- To turn on, press button on front face of light.
Exterior - Flood Lights
The flood lights are very bright and great for setting up camp or seeing around a campsite.
- To turn on, locate accessory switch panel just inside rear camper door and flip rocker switch.
Exterior – Down Lighting
The exterior down light package is ambient lighting and great for seeing around camper.
- To turn on, locate accessory switch panel just inside rear camper door and flip rocker switch.
Advanced Power System Lighting
If camper is equipped with Redarc RedVison, most lights have dual switch functionality via the RedVision (or RedVision app) and the switch panel. If switches get out of sync, flip rockers switch to re sync.
Water System
All classic slide-in and flatbed campers (no Base Model) come standard with a 20 gallon freshwater tank mounted low and centered at the front of the camper. Hawk+ Flatbed is equipped with a 40 gallon freshwater tanks. One or two water manifolds are utilized to direct water to different parts of the camper.
- Water Heater Bypass Valve
- If camper is equipped with the optional water heater, the water heater bypass valve is located in a cabinet near the sink in the same cabinet as the water pump.
- To use water heater, ensure that water heater bypass valve is in the open position or in line with the pipe.
- Warning! If winterizing or blowing water out lines, ensure that water heater bypass valve is in the closed position or perpendicular to with the pipe.
- Water Tank Drain
- If camper is equipped with a water system, then an external water tank drain will be located at the rear of the camper.
- The drain is used to drain the 20 gallon freshwater tank. When draining the water tank, it is helpful to have camper parked on an incline to drain fully.
- If winterizing, please follow additional winterizing steps.
- It is also great to use for utility water like washing hands or rinsing dishes.
- Water Level Monitor
- If camper is equipped with a water system, then there will be a water level monitor.
- Regular Camper: Level monitor will be located on a cabinet face near sink
- Press and hold the “Water Level” button, then a series of lights will turn on to indicate tank level. Full = 4x lights, 2/3 full = 3x lights, 1/2 full = 2x lights, 1/3 full = 1x light, Empty = no lights.
- Advanced Power Systems: Level monitor will be located on the Redarc RedVision display or RedVison app. Water Level percentage will show on main screen.
- Regular Camper: Level monitor will be located on a cabinet face near sink
- If camper is equipped with a water system, then there will be a water level monitor.
Water Tank Fill
Tools needed: Key to water fill door, drinking water safe hose, water filter (optional), potable water source
- To fill the 20 gallon freshwater tank:
- Unlock water fill door on exterior of camper.
- Open water fill port by turning cap counter clockwise.
- Connect drinking water hose to potable water source.
- Connect water filter (optional ) to end of hose.
- Feed the end of hose into water fill inlet.
- Turn on water source and stay nearby. Fill time will depend on water pressure.
- Indication that water tank is full will be water overflowing the water fill inlet.
- Turn off water source and remove hose.
- Close water fill port by turning cap clockwise.
- Lock water fill door.
City Water Connection
The city water connection will allow the camper to be connected directly to water source, bypassing the water tank. The city water supply will NOT fill the water tank; it will only supply water to the sink, water heater, and shower fixture(s).
Tools needed: Key to water fill door, pressure regulator, drinking water safe hose, water filter (optional), potable water source
Warning! A pressure regulator is required to avoid possible damage to the water system due to excessive incoming water pressure.
- To connect the City Water:
- Unlock water fill door on exterior of camper.
- Connect drinking water hose to potable water source.
- Connect water filter (optional ) to end of hose.
- Thread pressure regulator onto drinking water hose.
- Thread hose with pressure regulator to camper city water connection port.
- Turn on water source.
- Close and lock water fill door by locating hose through hose hole on door.
- Disconnect hose before travel.
Sanitizing Water System
It is good practice to sanitize the camper freshwater tank periodically, every 6-12 months depending on use and water quality used to fill the tank.
Tools needed: Key to water fill door, drinking water safe hose, water filter (optional), potable water source, unscented household bleach (5-9% sodium hypochlorite) or water tank sanitizer
- To sanitize water system:
- If camper is equipped with water heater, close water heater bypass valve.
- Warning! Any solution other than water may damage water heater.
- Fill water tank to almost full.
- Measure ¼ bleach (regular, non-scented) or use water tank sanitizer instructions.
- Warning! Bleach can cause injury or damage materials. Use caution and follow instructions on bleach container.
- Dilute bleach with about 1 gallon of water.
- Use funnel in water tank fill inlet to put bleach solution into fresh water tank.
- Run the sink faucets and any shower(s) for 20 – 30 seconds.
- Allow to treated water to sanitize the water system for about 4 hours. It can help to drive around so that all parts of water tank make contact with the mild bleach solution.
- Drain the 20 gallon fresh water tank.
- Flush the water system, faucets, and showers with clean, fresh water. Repeat as necessary.
- Open water heater bypass valve if equipped.
Water Pump
If camper is equipped with water system, then it will have an on-demand water pump. The water pump must be on for sink faucet, shower and Dometic or Thetford built in toilets to function. To use water pump:
- For regular camper:
- Ensure water tank has sufficient water or camper.
- Filp water pump power switch on, it is located on the water level/battery level monitor on cabinet near sink.
- Open faucet to purge any air in water system. Water should pump smoothly. System is ready to use.
- Open or close faucets to use sink or showers. Water pump will auto shut off when faucets are closed.
- Flip water pump power switch off when not in use and for travel.
- For Advanced Power System campers:
- Ensure water tank has sufficient water or camper.
- Water pump can only be turned on via RedVision display or RedVision app.
- Open faucet to purge any air in water system. Water should pump smoothly. System is ready to use.
- Open or close faucets to use sink or showers. Water pump will auto shut off when faucets are closed.
- Turn off water pump when not in use and for travel.
Warning! Do not allow water pump to run dry, this can cause damage to the pump.
Grey Water
- Standard Campers
- If camper is equipped with a fresh water tank, then it will have an exterior grey water drain for the sink. If the camper also has optional inside shower, there will be a secondary drain.
- Best practice is to use a hose threaded to the grey water drain and a collection container.
- Hawk+ Flatbed
- Hawk+ has a 5 gallon grey water holding tank with low point drain hose. If camper is equipped with RedVision, then the tank level will display.
NOTE: Grey water should be responsibly disposed of. Disposal options include flushable toilet, sink or dump station.
Water Heater
https://youtu.be/54tXbhqTlVg?si=TbmhJrdBLfMIyBLl
The Truma AquaGo Comfort Plus is an on-demand water heater. Please refer to Truma AquaGo Comfort Plus and CP Plus display operating instructions for more details. Warranty registration for up to 24 months is available via Truma.
NOTE: Camper will ship with Truma water inlet filter removed, filter must be secured into position before operation of water heater.
Warning! Water heater should never be in operation while camper is in motion, damage can occur to water heater.
- To operate water heater:
- Propane: Ensure that propane tank has propane, then slowly turn propane valve to open.
- Power: Battery or shore power is required to run water heater.
- Water: Be sure that your water tank has sufficient water and water pump is on.
- NOTE: For first time use, check that inside water heater bypass valve is in the open position to ensure that water is flowing into the water heater. Valve can be found in water heater cabinet on the inside of the camper.
- From the exterior Aqua Go access panel:
- NOTE: Lift access panel to remove, trying to hinge panel may result in damage.
- Ensure that the AquaGo Comfort’s power supply is switched on (default should be on and can stay on).
- Ensure that water inlet filter is secured with the gasket well seated and Easy Drain Lever clicked closed.
- Turn water pump on using interior water pump switch or RedVision .
- Fill and pressurize water system by letting water flow from both the cold and hot faucet
- NOTE: For first time use or after refilling your water system, you’ll need to fill and pressurize water system by opening cold and hot faucets until water flows from the system.
- Use interior Truma control panel to operate water heater.
- Camper may be equipped with either a dial control panel or a CP Plus display control panel
- To make selections on the CP Plus you must push in dial to select options. There is also a back button to go back to home screen.
- Camper may be equipped with either a dial control panel or a CP Plus display control panel
- Use control panel to switch on water heater.
- With dial control panel:
- Turn rotary switch to either Eco or Comfort Mode.
- Eco Mode: Energy saving mode where water flow turns on water heater and quickly warms to 120F. Provides on demand hot water and keeps water at 41 degrees to prevent freezing of water heater.
- Comfort Mode: Provides rapid, near instant hot water and keeps water at 102 degrees for faster hot water delivery.
- With CP Plus display:
- You’ll select the Water Heater icon (water lines w/ thermometer icon), then set it to Eco or Comfort Mode. You’ll then be prompted to select desired water temperature (95-120 F), tap the dial to select option.
- Eco Mode: Energy saving mode where water flow turns on water heater and quickly warms to desired temperature. Provides on demand hot water and keeps water at 41 degrees to prevent freezing of water heater.
- Comfort Mode: Provides rapid, near instant hot water and keeps water at 102 degrees for faster hot water delivery.
- With dial control panel:
- To use hot water turn on faucet or shower to hot.
- To turn off water heater.
- Dial Control Panel: Turn rotary dial to the off position.
- CP Plus: Select water heater icon, then turn dial to off and push dial to select off.
- NOTE: Propane system along with propane appliances should always be turned off while vehicle is in motion.
- Winterization
- Warning! In frost conditions at ambient temperatures below 39 °F (4 °C), there is a risk that water in pipes, faucets and appliances could freeze and cause damage to water system.
- Winter operation of water heater will not protect the campers entire water system. Water lines, faucets, water tanks and the external water valves and the vehicle must be heated separately.
- To Winterize Water Heater:
- Turn off water heater and water pump.
- Depressurize system by opening faucet for both cold and hot water or use pressure release valve found in exterior access panel.
- Let residual hot water in the system cool down before draining.
- From exterior access panel, remove water inlet filter.
- Any remaining water will drain from water heater.
- Store filter in access panel.
- Warning! Always store winterized camper w/ filter removed.
- Warning! Never blow out water heater with compressed air. Shut off water valve to water heater if using compressed air to blow out other parts of water system.
- Warning! Never put anti-freeze or other winterizing products into water heater. Shut off water valve to water heater if using anti-freeze or similar to winterize other parts of water system.
- Warning! In frost conditions at ambient temperatures below 39 °F (4 °C), there is a risk that water in pipes, faucets and appliances could freeze and cause damage to water system.
- Cleaning/Decalcification
- Cleaning: To keep the appliance fully functional, clean the water inlet filter at least once a year. Follow instruction in AquaGo Owners Manual.
- Decalcification: Once a year (or more often), water heater needs to be decalcified and a “Clean” warning may appear. This means your water heater must be decalcified. Please refer to owner’s manual for instructions.
- Warning! Never put bleach or other sanitizing products into water heater. Shut off water bypass valve to water heater if using sanitizing products to clean other parts of water system.
- Notes
- Common error codes are:
- E1W: No propane reaching system
- Ensure that propane tank has sufficient propane gas, is connected, and in the open/on position.
- Bleed propane line by igniting and running stove flame.
- W27W: No water in circulation pump
- Ensure that inside water heater bypass valve is in the open position to ensure that water is flowing into the water heater.
- Other error codes can be found in Truma Owners Manual’s.
- E1W: No propane reaching system
- Common error codes are:
Sink & Faucet Operation
- Ensure water tank has sufficient water or camper is connected to city water.
- Turn on water pump. If connected to city water, system can be used w/o the water pump on.
- Open lid to flush mount sink and position faucet to middle of sink. Swiveling faucet from side to side can damage faucet.
- Extend the faucet handle away from the faucet to control the water pressure.
- Swivel the handle upwards or downwards to control the mixture of hot and cold water.
Outside Shower Operation
- Ensure water tank has sufficient water or camper is connected to city water.
- Turn on water pump. If connected to city water, system can be used w/o the water pump on.
- Turn on water heater to use hot water.
- Insert the provided shower wand into the outside shower connector.
- Turn shower connector to control flow and water temperature.
- Water may take several seconds to become hot depending on water heater setting.
- Hold shower wand handle to allow water to flow. Handle shut off helps conserve water.
- Remove shower wand before travel.
NOTE: When winterizing camper, always winterize outside shower connection. This is an often forgotten step!
Inside Shower Operation
- Ensure water tank has sufficient water or camper is connected to city water.
- Turn on water pump. If connected to city water, system can be used w/o the water pump on.
- Turn on water heater to use hot water.
- Hook up grey water hose and collection container to shower grey water outlet.
- Hang provided shower curtain.
- Orient shower curtain with exposed bungee cords at the top and shower opening facing camper hallway.
- Hook bungees on to 9 ceiling hooks.
- Be sure nothing is obstructing shower drain.
- Tuck bottom of shower curtain under drain grate. This allows water to flow into drain basin.
- Insert the provided shower wand into the inside shower connector.
- Turn shower connector to control flow and water temperature.
- Water may take several seconds to become hot depending on water heater setting
- Hold shower wand handle to allow water to flow. Handle shut off helps conserve water.
- Remove shower wand and shower curtain before travel.
- Be sure to let shower curtain and drain basin dry completely.
NOTE: When winterizing camper, always winterize inside shower connection.
Winterizing Water System
https://youtu.be/6ZmulneOyG0?si=2cuWJVlBl3GyywSx
It is recommended to completely winterize the camper water system if the camper will be in freezing temperatures. In frost conditions at ambient temperatures below 39 °F (4 °C), there is a risk that water in pipes, faucets and appliances could freeze and cause damage to water system.
Warning! Not properly winterizing the camper water system can result in freezing damage to any part of the water system. Damage may cause the system not to work and/or a water leak. Repairs can be expensive!
Warning! Water heater should never be in operation while camper is in motion, damage can occur to water heater.
- Drain fresh water tank.
- Open water tank drain valve, faucet, and outside shower (if equipped) to help expedite draining.
- Stay nearby as to not run water pump dry.
- Park at a rear decline to use gravity to drain tank faster.
- Open water tank drain valve, faucet, and outside shower (if equipped) to help expedite draining.
- Open sink faucet in cold and hot positions several times to ensure water is out of line. Water will sputter due to pressure.
- Turn off water pump once no more water is coming out of sink faucet.
- Water Heater Winterization
- Turn off water heater and water pump.
- Depressurize system by opening faucet for both cold and hot water or use pressure release valve found in exterior access panel.
- Let residual hot water in the system cool down before draining.
- From exterior access panel, remove water inlet filter.
- Any remaining water will drain from water heater.
- Store filter in access panel.
- Close water heater bypass valve.
- Warning! Never blow out water heater with compressed air. Shut off water valve to water heater if using compressed air to blow out other parts of water system.
- Warning! Never put anti-freeze or other winterizing products into water heater. Shut off water valve to water heater if using anti-freeze or similar to winterize other parts of water system.
- Leave water tank drain valve, sink faucet and shower connection in open position.
- Attach provided Blowout Plug to city water connection.
- Warning! Do not use compressed air unless drain valve, sink faucet and shower connections are in the open position. Pressurizing the water system can result in damage to water system.
- Use tanked air compressor with short spurts of compressed air to blow out any residual water. Alternate faucet and shower to cold and hot positions.
- If equipped with inside shower, repeat blowing out process with the inside shower open.
- On water pump, remove filter cap and store in water pump cabinet.
- Leave faucet in open position during storge to allow for any remaining water to expand.
- To de-winterize water system:
- Replace water pump filter cap.
- It can help to prime water pump by adding fresh water into cap before screwing on.
- Open water heater bypass valve.
- Replace water heater filter.
- Warning! Be sure to wet the o-ring gaskets on water heater filter before inserting into place to prevent damage to o-ring. Replacement o-rings can be purchases from Truma online, not available at standard hardware stores.
- Fill water tank with fresh water.
- Turn on water pump and allow system to pressurize until there is a steady flow of water.
- Replace water pump filter cap.
Air & Heating Systems
Ventilation & Condensation Tips
It’s always good to have ventilation in the camper, there’s nothing like fresh air!
To minimize condensation:
- Crack a roof vent open along with the corner of a window to allow for airflow.
- Condensation is promoted by moist conditions, internal/external temperature differences and/or breath.
- If condensation does occur, wipe down damp areas before lowering the roof. As soon as possible, allow camper to completely air out and dry.
- If camper lives in cold, wet, snowy conditions, it’s good to remove mattress during winter storage and pop up camper periodically to air it out.
Roof Fan Operation
https://youtu.be/wfpERjH54iI?si=QZgjNTcveIMLvFBk
- Use the ON/OFF button to start the fan or to turn off the fan.
- Press both the up and down arrow at the same time to fully open or close vent w/o using fan.
- Use the IN/OUT button to reverse the direction of the fan. The fan will slow down and pause for 2 seconds before resuming operation in the opposite direction.
- The AUTO mode allows the thermostat to turn the fan ON and OFF depending on the thermostat setting. Press this key once for less than 3 seconds to enter AUTO mode, 3 quick beeps will confirm the fan has entered Auto Mode. To Exit Auto mode, press the ON/OFF key. The Green LED light will light to indicate the fan is in Auto Mode. Please refer to the manual for adjustment instructions.
- Knob: Pull to unlock prior to turning. Rotate the knob clockwise to close the vent lid, and counter-clockwise to open the vent lid. Push inward to lock when vent lid is open or closed.
- The remote control allows for full control of the fan while in bed or outside of the camper. A unique feature only available via the remote is a custom Temperature Setting for AUTO mode. If AUTO mode is on, the fan will activate/deactivate when exceeding or dropping below the set temperature.
- Rain sensor: Engage the rain sensor and fan will automatically close when detecting rainfall.
Furnace
https://youtu.be/2mgFN77v-ag?si=2sQrSEMS9F_QF-P-
The Truma VarioHeat is a warm air heater for circulated air designed to heat the camper quickly. Please refer to Truma VarioHeat and CP Plus display operating instructions for more details. Rated for use of up to 8800ft.
- To operate furnace:
- Propane: Ensure that propane tank has propane, then slowly turn propane valve to open.
- Power: Battery or shore power is required to run furnace.
- Note: For first time use or after reconnecting propane tank, it’s helpful to purge your propane line by turning on the stove and running the flame for about 1 minute. It may take the Truma furnace a couple cycles before propane enters the system and furnace ignites. Error Code E2H may appear if propane does not reach unit, try restarting a few time.
- From inside of camper, use Truma CP Plus display to control the furnace.
- To make selections on the CP Plus you must turn dial and push in dial to select options. There is also a back button to go back to home screen.
- You’ll select the Furnace icon (motor home symbol), then turn dial to desired temperature and push dial in to select temperature.
- Auto Mode is the default furnace mode
- The furnace always starts at the lowest setting and will run a warm up cycle. If this is not sufficient to achieve the desired temperature in the camper, the furnace switches to a higher operating level after a few minutes.
- To change Fan Mode go to Fan icon from home page.
- Auto Mode: Automatically selects the proper operating/fan level based on the difference between the desired temperature set at the control panel and the current room temperature.
- Night Mode: Ultra-quiet fan operation.
- Boost: Rapid heating. Available if the difference between the selected and actual room temperature is >18 °F.
- Vent Mode: When furnace is off, you can set fan to Ventilation Mode that allows for air circulation without heat.
- Enjoy heat and be sure to crack a window, vent fan or turnbuckle door to allow for fresh air ventilation. This also helps with condensation.
- To turn off furnace, use CP Plus display to select furnace icon, then turn dial to off and push dial to select off.
- Note: Furnace goes through a required cool down cycle of about 2-5 minutes before turning off fully. This cool down cycle is essential, do not bypass.
- Propane system along with any propane appliances should always be turned off while vehicle is in motion.
- Notes:
- Do not block temperature sensor or vent.
- CP Plus will only display set temperature, it does not read ambient temperature.
- For use in altitudes of more and 8800ft.
- Common error codes are:
- E2H: No propane reaching system
- Ensure that propane tank has sufficient propane gas, is connected, and in the open/on position.
- Bleed propane line by igniting and running stove flame.
- Cycle system on and off 10 to allow for air to move through the lines after changing tank or running out of propane to purchase lines.
- W27H: Circulation Issue (Overheat)
- Ensure there is no obstruction of the vents.
- High prolonged temperatures can also trigger code.
- Other error codes can be found in Truma CP+ Owners Manual.
- E2H: No propane reaching system
12V Roof Mounted AC
Please refer to Nomadic x2 owner’s manual for operation instructions.
- Recommended use:
- The AC system needs to be monitored when in use.
- Check battery level prior to start and note charge.
- It’s ideal to be receiving as much charge as possible via truck, shore power and/or solar.
- Best to start cooling when temperatures are cooler. Fase cooling cannot be expected if camper is already hot.
- Start with Power mode for no longer than 20 minutes to quick cool camper. Using for any longer will draw lots of power and will shorten your battery life dramatically.
- To maintain temperature, set to Eco mode at 78 degrees or higher.
- Keep checking battery level and take into account incoming power vs expected power consumption of all battery powered items.
- While using AC, the power system may operate at a power deficit even while plugged into shore power.
- Power(Max) mode will draw variable amps up to 55amps depending on ambient temperature.
- Eco mode will cap power draw to no more than 30amps.
NOTE: If power is not managed while using AC, batteries can deplete and may render other powered items unusable.
Propane System
Most campers come standard with a regulated propane system (LP) and two 2.5 gallon/5 lbs propane tanks. Propane is used in operation of the stove, furnace and water heater. The propane tanks are mounted in a sealed, vented cabinet on the exterior of the camper for easy removal and filling.
- Propane system to propane tank connection is a Type-1 (CGA 791) fitting.
- To connect and use propane system:
- Ensure propane tank has propane
- Connect single hose and fitting within the propane cabinet to one propane tank. Ensure propane hose fitting is properly threaded to tank.
- Slowly open propane valve to let system pressurize.
- Once pressurized, propane system is ready to use
- In some cases, air bubbles might restrict the flow of propane. Once method to fill propane lines is to light a stove burner for about 1 minute.
- It is recommended to purge propane lines before storing camper. To purge: close propane valve, light stove and let remaining gas burn off, turn off stove.
- Warning! If you smell propane, exit camper and immediately turn off propane system.
- Please follow directions in Safety section.
- Periodically test CO2/Propane Detector system to ensure proper function.
- Warning! Do not travel with propane system on. It is unsafe, can lead to damage of system and may be illegal in some locations.
- Propane Tank Check Valve: The included excess-flow check-valve is designed to close and allow only a small bypass flow (no more than ten cubic feet per hour) of gas any time there is a larger than expected flow through the system.
- To reset the check valve, open the tank quickly then close. Wait for 60 seconds and slowly open the tank and your valve will be reset.
Filling Propane Tanks
Note: The gas system is designed for use with Propane aka liquefied petroleum gas (LP Gas) only.
New campers are delivered with empty propane tanks
- Always purge new propane tanks before use for safety and efficiency
- It is recommended that first fill of a new propane tank be completed by a propane supplier company.
- New propane tanks should be purged before their first fill to remove shipping air, which can be up to 100 PSI. This process ensures the tank can be fully filled with liquid propane. Purging is done by replacing the shipping air with propane vapor, or by using a vacuum pump to remove air before adding propane vapor.
External Low Pressure Propane Port
The optional external propane port is a low-pressure propane connection to be used with portable low-pressure appliances like camp stove (w/o built in regulators), grills, griddles, heaters and fire pits designed for low pressure input.
NOTE: Many portable propane appliances have built-in regulators designed for high-pressure propane (such as 1 lb. bottle connections). These appliances will not work properly if connected to a low-pressure port unless the regulator is removed or bypassed. Always check manufacturer specifications.
To use external propane port:
- Locate supplied propane hose with a Type-1 (CGA 791) fitting on one end, and quick connection with red turn knob on the other end.
- Find the port on the exterior of the camper (square plastic cover lifts up from the bottom) and use the red quick connection end to insert and rotate counterclockwise to lock into place.
- Before connecting any appliance, make sure your propane tanks are turned OFF.
- Connect the other end (FITTING) to your appliance and then proceed to turn on your propane.
- Make sure all connections are tight and propane can flow into hose to avoid risks of system leak.
- Warning!
- Never modify or adapt high-pressure appliances to fit a low-pressure connection.
- Always turn off propane at the main valve when not in use.
- Check for leaks regularly and inspect hoses for wear or damage.
- Use in a well-ventilated outdoor area to prevent gas buildup.
Interior Features
Floor Plans
Open Floor Plan (Base Models)
- The standard base model is an open floor plan without any seating. This allows for ample space inside the camper. Other floor plans are available depending on camper model.
Rollover Couch
- To convert rollover couch into bed:
- Remove front settee cushion that is resting on water tank area.
- Grab back rest of the couch and pull forward until it rolls forward.
- Flip the back rest completely over until it is flat / flush with the couch seat .
- Reverse the process to convert the bed back into the couch/seating position.
- Warning! Keep hands and fingers aways from steel hinges to avoid injury.
Side Dinette
- To convert side dinette into bed:
- Remove swivel table and leg, set aside.
- Grab back rest of the rear seat and pull forward until it rolls forward.
- Flip the back rest completely over until it is flat / flush with the front seat.
- The back rest or water tank cushion should be used to fill void near camper door to complete the bed.
- Reverse the process to convert the bed back into the dinette seating position.
- Warning! Keep hands and fingers aways from steel hinges to avoid injury.
Front Dinette
- To convert rear dinette into bed:
- Remove swivel table and leg, set leg aside
- Place table top in between the two seats onto support cleats
- Slide the two seat cushions together
- Lower each back rest cushion to a flattened position and slide the cushions underneath the back rest support brackets, and snugly up against each wall
- Reverse the process to convert the bed back into the dinette seating position
- Warning! Keep hands and fingers aways from steel hinges to avoid injury.
Rear Dinette (Flatbed Models)
- To convert front dinette into bed:
- Remove swivel table and leg, set leg aside.
- Place table top in between the two seats onto support cleats.
- Slide the two seat cushions together.
- Lower each back rest cushion to a flattened position and slide the cushions underneath the back rest support brackets, and snugly up against each wall.
- Reverse the process to convert the bed back into the dinette seating position.
- Warning! Keep hands and fingers aways from steel hinges to avoid injury.
Cabover Sleep Platform & Mattress
- To extend bed platform:
- Grab center of platform and pull out to extend bed until platform meets the bed rail stoppers.
- Place mattress insert cushions (splits) into place with the long sides against mattress.
- To store bed platform:
- Remove mattress insert cushions, grab center of platform and push inward.
- Completely stow platform for travel.
Underbed Storage
- Underbed storage is an option for Slide-In Models (not Base Model) going onto heavy duty trucks and standard for Flatbed Models & Orvis Special Edition campers. To access underbed storage:
- Be sure nothing will obstruct lifting mattress or wood panel. Close windows and/or thermal pack to prevent them catching as wood panel lifts.
- Carefully lift wood panel underneath bed slide-out which has gas lift assist struts.
- Warning! Do not force or over extend the gas struts, this can damage lift system or mounting points.
- Recommended storage weight limit is 200lbs. Heavier items should be stored closer to camper front wall and lighter items stored toward front of cabover.
Refrigerator
The Isotherm 2-Way (AD/DC) refrigerators come in 3 sizes 65L, 85L and 130L. The refrigerators are designed for use in environments with external temperatures ranging from 0 to 45 °C (32 – 113 degrees Fahrenheit).
- For consistent use, ensure battery(s) are charged or camper is connected to shore power.
- The refrigerator’s temperature is regulated by the thermostat, which also includes a power off function if turned counter clockwise to the end position.
- To adjust the temperature, turn the thermostat clockwise to lower the temperature, and vice versa.
- 5 on the temperature dial is a good place to start.
- To turn off the refrigerator, overcome the slight resistance of the knob past 0
- In temps over 85F:
- Put only cold items into fridge and a full fridge is an efficient fridge.
- Turn on refer fan on accessory switch panel and park fridge on shady side of truck.
- When traveling, use additional closure latch to prevent door from opening on rough roads.
- When fridge is not in use: defrost, clean fridge, and set door stopper located in frame above refrigerator latch to the ventilate position. This allows fridge to stay fresh.
- Do not store items in exterior refrigerator vent.
- Other tips:
- Plug in to shore power and turn on refrigerator the night before a trip to cool down fridge.
- Position the products inside the refrigerator so that they do not obstruct the circulation of air inside. Do not cover the shelves with plastic, paper, etc.
- The freezer compartment can be used to store frozen foods for a few days but is not cold enough to freeze them.
- In order to make ice, the ice cube tray should be placed against the evaporator without placing any other products on top of it. For faster ice production, set the thermostat to its maximum cooling capacity.
- Allow hot products to cool before placing them in the refrigerator.
- To reduce frost formation in and on the freezing compartment, cover stored liquids and moist foods and do not leave the door open longer than necessary.
- Defrost refrigerator every 7 to 21 days, depending on the humidity level.
- Defrost when the layer of frost on the evaporator reaches a thickness of 3 - 4 mm or more.
- Do not use sharp objects to remove ice and frost from the evaporator, as this could damage it and result in leaks.
- After defrosting, remove freezer water catch and dispose of collected water then wipe down fridge.
Stove Tops
2 Burner Propane Stove
- Ensure propane tank is full and valve is open.
- Gently lift the stove cover up until it stops by itself at about a 90 degree angle.
- Push nob in and turn counterclockwise and immediately flip the ignite switch. Keep nob pushed in for 5-10 seconds once lit.
- Be careful to keep hands, fingers, & face away from the flame.
- Lower flame to desired heat
- Warning! Ensure that pots or pans do not extend over stove nobs or counter top, this can cause damage to stove and/or counter top.
- To turn off stove, turn nob to the off position.
- Always let burner cool down before cleaning or closing stove lid.
- Keep stove clean of debris or grease.
2 Burner Induction Stove
An optional portable 2 burner induction stove can only be used when plugged into 120V power and camper is connected to shore power or inverter is powered on.
- Be sure to use induction compatible (magnetic) cookware.
- Be mindful of power usage and induction cooking has a high-power draw.
- NOTE: Surface will remain hot after use.
Thermal Pack
The thermal pack is intended to help with heat or cold retention and create an air barrier between pop up vinyl and interior of camper. It also helps with light entering the camper. All campers come equipped with upper and lower Velcro to affix optional thermal pack into place. To order a thermal pack, please contact the FWC Service Department or local dealer.
- General Care:
- Most stains on fabric can be removed by spotting cleaning with lukewarm water and gentle soap.
- It is not recommended to launder the thermal pack in washing machine as damage may occur.
- Air dry, do not iron.
- To install thermal pack:
- Start on one side by aligning thermal pack windows with pop up windows. Flaps should open downward.
- Moving from the center out press thermal pack to upper Velcro ensuring it is taught and still aligned with windows.
- Press thermal pack to lower Velcro ensuring it is taught.
- Continue toward one corner of camper.
- Tuck any remaining fabric behind lift panel.
- Complete attachment to other corner and tuck.
- Repeat on other side of camper.
Toilets
- Front Dinette campers equipped with built-in toilet will have a Thetford cassette toilet. Please refer to the manufacturers owner’s manual for operation instructions.
- Flatbed models equipped with built in toilet will have a Dometic cassette toilet. Please refer to the manufacturers owner’s manual for operation instructions.
- Toilet Tips:
- DO NOT over fill waste tank.
- Vent any built-up heat or altitude pressure and prevent splashing. Close cover then open and close holding tank valve.
- Ensure toilet flush flap is fully closed to prevent odors from inside camper.
- Portable Toilets are available for any camper.
- Thetford Porta Potti: Please refer to manufacturers owner’s manual for operation instructions.
- Clean Waste: Please refer to manufacturers owner’s manual for operation instructions.
Exterior Features
Visual Key
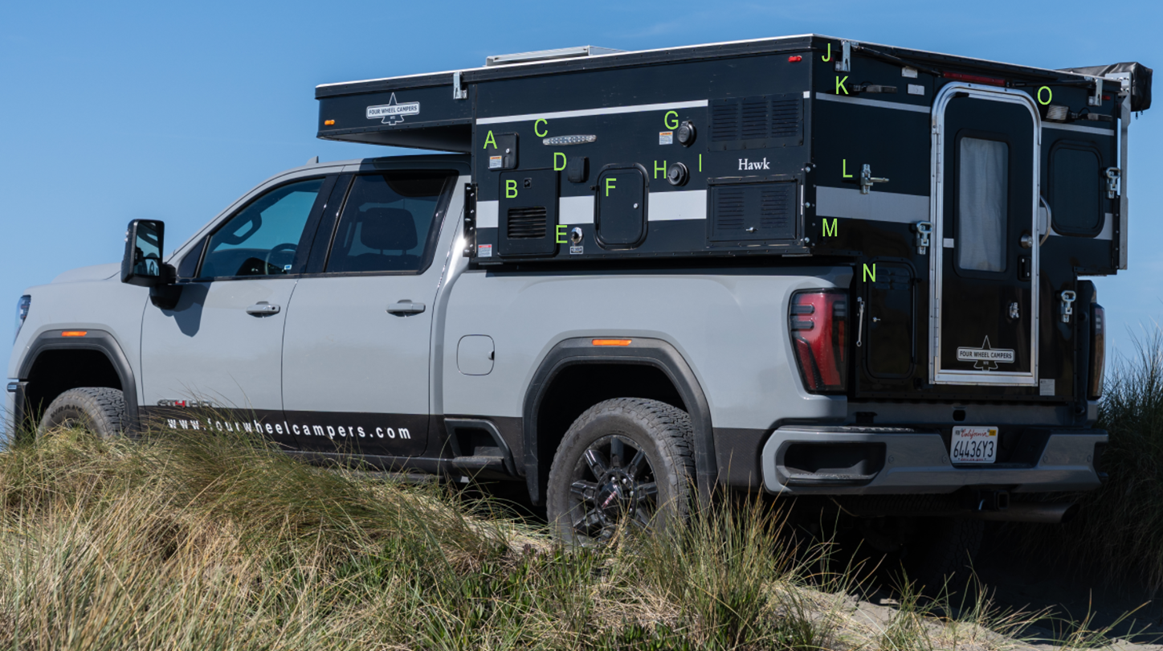
A. Water Fill & City Water Connection
B. Water Heater
C. Exterior Down Lights
D. Outside Shower
E. Sink Drain
F. Outside Storage (Some Floor Plans)
G. Shore Power
H. Furnace Vent
I. Refrigerator Vents
J. Roof Cam Latch (6 Total, limited models 5)
K. Flood Light
L. Rear Wall Step (4 total)
M. Aluminum Jack Bracket
N. Propane Access Door
O. Porch Light
Door & Screen Operation
- Locks
- Deadbolt: The upper lock is a deadbolt with a key that looks like a house key. Insert the key, turn the key clockwise to lock the deadbolt, turn the key counter clockwise to unlock the deadbolt. Push the door in slightly to engage the lock if necessary.
- From the inside, twist deadbolt counterclockwise to lock and clockwise to unlock.
- Paddle Door Latch & Deadbolt: The lower 2 locks are for paddle door latch its own small deadbolt built into the door handle latch. To lock the paddle latch, insert the square camper key, twist, and remove key. Repeat in the opposite direction to unlock. For locking the small deadbolt on the door handle, insert the same square camper key, turn the key counterclockwise to lock it, and turn it clockwise to unlock the small deadbolt. NOTE: This deadbolt locking procedure is the opposite direction as the big house dead bolt on the upper part of the camper door.
- From the inside, twist paddle deadbolt clockwise to lock and counterclockwise to unlock.
- How to Open Door
- From the outside, unlock all locks and pull paddle door latch.
- From the inside, move screen door slide out of the way and pull paddle door latch.
- To keep door open, engage door to positive door latch. To engage, open the camper door to the fully open position, and secure the door latch to the small spring loaded door catch. To disengage, push in on the small spring loaded door catch and separate the 2 pieces.
- Screen Operation
- Open door, press screen latch handle to detach door from screen.
- Be sure to reengage screen door to door before closing camper door to prevent damage to screen latch.
- Sometimes screen catch location needs to be adjusted if screen door sticks when opening entry door.
- Deadbolt: The upper lock is a deadbolt with a key that looks like a house key. Insert the key, turn the key clockwise to lock the deadbolt, turn the key counter clockwise to unlock the deadbolt. Push the door in slightly to engage the lock if necessary.
Outside Storage
Some campers come equipped with lockable exterior storage doors.
Orvis Special Edition – Wet Locker & Rod Storage
- Wet Locker
- Wet/damp items can be stored in the wet locker.
- Storage is equipped with drain for cleaning out. Ensure to remove large debris before using the drain and take care to not spray water on inside access door.
- Rod Storage
- On each side of the camper is equipped with lockable, sealed and padded storage for 3x fly rods.
- Always inspect that rods are securely in place and will not rub against any surface.
Roof Racks
Roof Tracks Only
The optional roof tracks are a useful tool for mounting items to the roof without modifying camper. The roof tacks come with various sliding t-nuts installed and can be used with M6-1mm bolts to secure items to the camper roof. The roof tracks will vary in length & width depending on camper model and roof length.
NOTE: The maximum load limit is 100lbs spread evenly across camper roof.
Yakima Roof Rack System
The Yakima Complete Rack Roof System will include Yakima tracks, control towers, landing pads, cross bars, lock cores, and a set of keys. This rack is intended for carrying small, lightweight items while trying to minimize wind drag. The cross bars are set at a factory standard distance apart, spacing can be adjusted. Please follow the Yakima user manual.
NOTE: The maximum load limit is 100lbs spread evenly across camper roof.
Awnings
NOTE: To protect awning, best practice is to stow it away if there is wind or anytime campsite is unoccupied.
Fiamma Side Awning (8’)
- Set Up
- To open the side awning use provided crank handle pole found inside the camper.
- Attach the hook on the end of the crank handle to the eyelet on the end of the awning.
- Gently crank the handle counter-clockwise and let the awning come out about one foot.
- Look inside the leading edge of the awning case and gently pull outward on both ends of the left awning leg.
- Once the leg is free from the back of the awning case it should rotate freely downward. Lower the awning leg/foot down to the ground and tighten the adjustment knob so that the awning leg will support the weight of the awning. Repeat these steps for the awning leg on the right side.
- Proceed to extend the awning out, but do NOT extend so far that extension arms are straight- they should still have a slight angle. Overextending puts a stress on the linkage and makes it more difficult to retract the awning. The slight angle is also stronger, and will keep the awning in better mechanical condition for much longer.
- Stake down if needed.
- Pack Up
- Retracting the awning is the reverse of extending it.
- Keep the pivot points on the legs lubricated with a spray Teflon type lubricant to ensure smooth operation.
- When folding the retracted legs into the awning casing, ensure the thumb screws are tightened slightly after stowing to avoid loosening and loss.
- Allow awning to dry completely before storage.
Alu-Cab Shadow 270 Awning
- Set Up
- Open zip and flip the bag clear of the hinge.
- Undo the three Velcro straps.
- Grab all the arm ends and lift out of the cradle.
- Grab the strap on the top arm and pull it while waking to the rear of camper. Make sure that bystanders keep clear!
- Clip the strap onto the rail at the back of camper.
- Tighten the strap by pulling the loose end of the strap away from the cam buckle
- Raise the center bar on the middle arm until it locks into place.
- If required, drop the center support leg. Loosen the thumb screw and then pull the support foot out of its housing.
- With the foot of the center support leg on the ground, raise the awning slightly, and tighten thumb screw on the pole.
- If required, deploy the guy ropes from the awning arms.
- Pack Up
- Retracting the awning is the reverse of extending it.
- Grab the two lower canvas folds and roll the canvas upwards.
- When the third canvas fold is exposed, include it into the roll and carry on rolling upwards until the canvas roll is tight against the awning arms.
- Secure the canvas tightly with the three Velcro straps.
- Close the awning zip towards the rear of the vehicle.
- Allow awning to dry completely before storage.
Shower Enclosure
- Set up
- Unzip the transit cover and release the retaining straps to unroll the curtain.
- Pull the shower tent frame gently to engage the gas struts for self-deployment.
- Secure all corners with stakes.
- Warning! Be sure that shower enclosure is clear of any hot air exhaust from furnace or water heater. Use rear zip flap in needed. Damage can occur.
- Pack Up
- Remove stakes and items from internal pockets
- Fold the tent by pulling down the pack down strap while pushing the frame towards the baseplate.
- Ensure the curtain is flat, then roll it up from the bottom and secure it with velcro retaining straps.
- Zip up transit cover. Ensure that zipper does not catch on material when zipping up. If having trouble closing, the curtain roll may not be tight enough.
- Allow shower enclosure to dry completely before storage.
Rear & Sidewall Steps
The optional folding steps, when folded down, provide access to cargo on the roof. Be sure to have an adequate handhold when using the fold down steps, as they are not large enough to balance on. After use, fold the steps to the stowed position to avoid damaging other parts of the camper or injuring yourself.
Warning! The roof is NOT designed to be walked on, DO NOT climb on roof.
Flatbed Rear Rack
Rear rack has 100lb dynamic weight limit. It’s best to spread weight across the rack.
Maintenance
https://youtu.be/rFtATHeDZlI?si=_v9E8vU3AE1Ikfaq
Interior
Bamboo Countertop Care
The countertops are sealed to be more durable and stain resistant. They are treated with Rubio Monocoat Oil Plus 2C, Pure.
- Surface should only be cleaned with gentle soap and water.
- It is recommended to use Rubio Monocoat Renew oil every 6-12 months depending on use.
Interior Clear Vinyl Windows
- Only use warm water with a soft cloth to clean the clear plastic window flaps. Do not use any window cleaners!
Fabric Care
- Spot cleaning is recommended with water and mild soap. The affected area should be blotted, not rubbed to prevent permanent stains.
- Fabric covers should only be hand washed and air dried. Do not machine wash or use dryer.
- Storage: Always remove the upper bed cushions of the camper after each trip to allow any possible condensation to dry.
Condensation
- Wipe moisture and allow camper to air out to completely dry after each trip or if planning to store for an extended period.
- Storage: Always remove the upper bed cushions of the camper after each trip to allow any possible condensation to dry. Store in a dry place until next use.
Exterior
The camper has aluminum siding with automotive finish and a one-piece aluminum roof. There are various ports and doors located around the campers.
- Hard Side Aluminum
- The hard sides/body of the camper can be washed with a mild soap like Aerospace 303 Multi Surface Cleaner or Protect All.
- Warning! Do not use high pressure to wash camper or take camper through an automatic car wash. Damage can occur.
- Soft Side Pop Up Vinyl
- The soft sides/pop up portion of the camper can be washed with mild soap like Aerospace 303 Multi Surface Cleaner or Dawn dish soap.
- For extra tough marks, spot clean using a cleaner like Bixler’s Orange Off, a magic eraser and some elbow grease
- Treat vinyl inside and out with 303 Marine and Recreation Aerospace Protectant once a year to protect from UV damage
- Before long term storage ensure vinyl is clean and dry.
- NOTE: Do not use Armor-All, the oil can damage vinyl.
Long Term Storage
For long term storage the following is recommended:
- Camper should be clean and dry.
- Drain water tank and winterize if needed.
- Clean refrigerator and store with door ajar.
- Move mattress to a dry location if camper is stored in wet conditions.
- Turn off all electrical items and turn off the 12v master kill switch.
- Periodically check on camper, batteries and air out.
About Four Wheel Campers
https://youtu.be/QSUsxwHrVyk?si=3G2hvZHZmguFm2pt
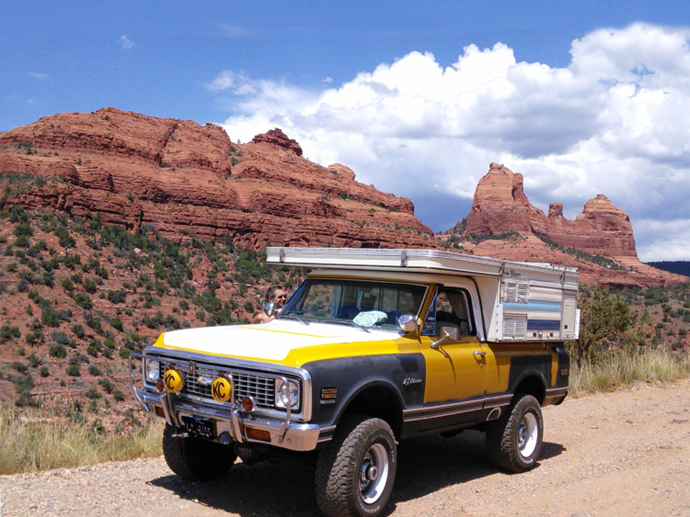
Our history has delivered enough twists and turns to fulfill many a grand adventure! After all the thrills and spills we feel fortunate to be among the few RV producers still standing since 1972. Now, as the world’s Pop-Up Truck Camper leader, and with the enthusiasm and guidance from our customers, we see blue skies and a clear path in our future.
As do many worthy outdoor endeavors, Four Wheel Campers was launched in Colorado. It was 1972 and Dave Rowe needed a way to go further off the beaten track. Vans had limitations, so he designed and built a hard-sided camper that could fit on a Scout, Blazer, or Bronco. The next evolution was to reduce weight via a pop-up style camper and design them to fit on standard pickup trucks.
Everyone associated with Four Wheel Campers is grateful that the company developed a pop-up design and standardized on welded aluminum frames. The pop-up design reduces weight and wind resistance. The aluminum frame reduces weight, increases durability, and eliminates water damage to wood. Since the beginning, this decision has resulted in a camper that can withstand a gauntlet of off-roading abuse, decade after decade. This has translated to happy campers and high resale values!
By 1989 the company moved to Woodland, CA, where it remains today. Back then, the term “Overlanding” was a reference to what was going on in Australia. By the mid 2000’s though, as an Overlanding lifestyle began gaining traction in the United States, the Four Wheel Campers product was a natural fit. The Overlanding market and community turned out to be our first specific, definable market. Over the years we have been fortunate to be closely involved with this dynamic group of people. As they have explored increasingly challenging terrain, their journeys have nudged us to continually improve.

Looking ahead, a goal is to reach more people involved in a variety of outdoor activities. We serve campground campers, those navigating a mobile lifestyle, mountain bikers, surfers, paddle sport enthusiasts, birders, photographers, climbers, and people doing just about any outdoor activity you can think of. With all the talk about people hunkering over computers, it is our privilege to talk to and learn from these explorers and adventurers.
Through our dealers, annual customer rallies, social media, old fashioned phone calls, and factory visitors, we are listening and learning. We heartily thank our current and future customers, and we endeavor to focus on products and services that make your travels a bit more adventurous…and enjoyable!
Happy Adventures!